
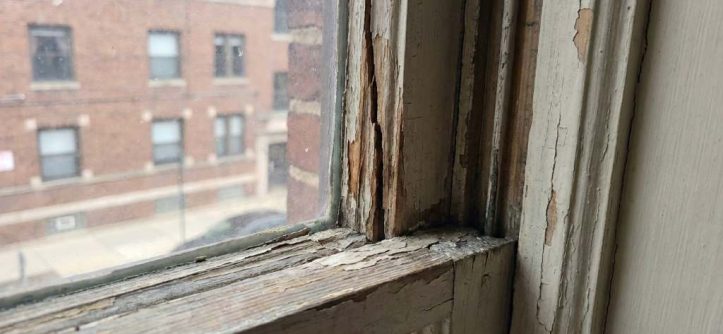
To fix cracked sashes in Chicago, first identify the crack, stabilize the frame, and repair the damaged material. Small wood cracks often need epoxy, while severe damage may require sash replacement or professional restoration. Chicago’s freeze-thaw cycles can worsen tiny defects quickly, so timely repair matters. Windows can account for roughly 30% of residential heating and cooling energy use. Therefore, fixing cracked window glass also helps when glass damage accompanies sash deterioration.
Key Takeaways
- Identify whether the crack affects wood, vinyl, aluminum, joints, or surrounding glass.
- Repair small wood sash cracks with compatible epoxy and careful surface preparation.
- Replace badly warped, split, or structurally weak sashes instead of forcing repairs.
- Address moisture sources before repairing the sash to prevent recurring damage.
- Check older Chicago windows carefully for deteriorated glazing, paint, and hardware.
- Historic properties may need specialized restoration methods and local approval.
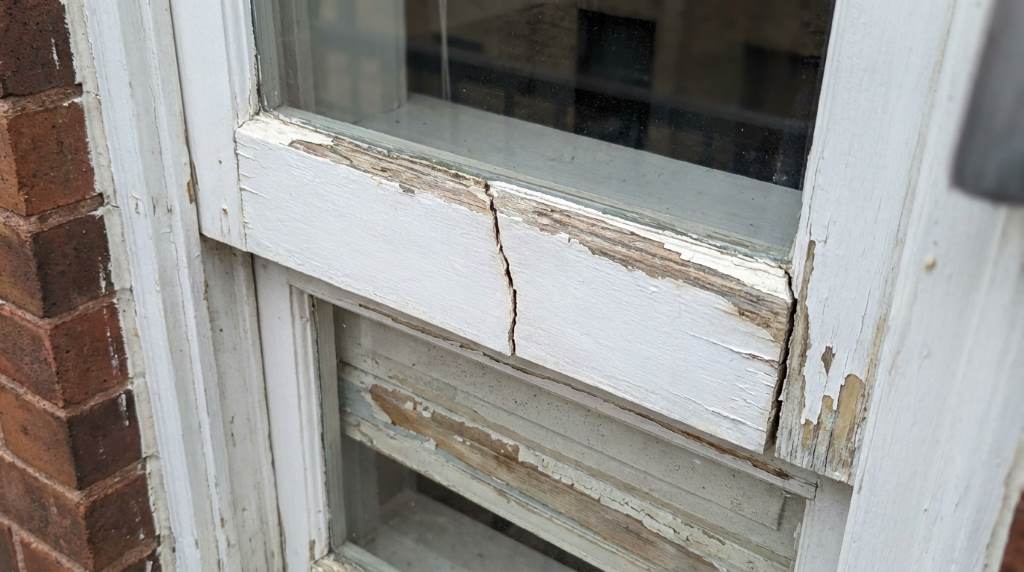
Start With a Careful Sash Inspection
Begin by opening and closing the window slowly, then watch how the sash moves. A healthy sash should travel smoothly without binding, twisting, or dropping unexpectedly. Next, inspect every corner because cracks often develop near joints and hardware.
Run your fingertips across the damaged area and check for movement. If the crack opens when you press nearby, the sash may have lost structural strength. Also, inspect the glazing putty, glass edges, weatherstripping, and meeting rails for related damage.
Chicago’s seasonal moisture changes can expand wood and stress weak joints. Consequently, a crack near a joint deserves more attention than a shallow surface split. Look for dark staining, soft wood, peeling paint, or swollen sections that indicate moisture intrusion.
If the sash contains glass, examine the pane before applying pressure during repairs. A cracked pane can break further when you manipulate a distorted frame. For that reason, stabilize fragile glass before attempting detailed sash work.
Prepare the Sash Before Repairing the Crack
Good preparation determines whether a sash repair lasts through Chicago’s changing seasons. Remove dirt, loose paint, deteriorated filler, and debris surrounding the damaged section. However, avoid aggressive scraping when the existing coating may contain lead.
For older homes, use appropriate lead-safe work practices and avoid creating unnecessary dust. Meanwhile, protect the glass with durable masking material before sanding or applying repair compounds. If the sash shows widespread decay, stop surface work and assess replacement options.
Remove the sash from its track only when the design allows safe removal. Some traditional windows use cords, weights, springs, or specialized hardware that requires careful handling. Therefore, photograph the hardware before disassembly so you can restore its original position.
After removal, place the sash on a stable work surface. Support it evenly so the frame does not flex while you inspect the crack. Then mark loose joints, damaged areas, and missing material before choosing your repair method.
Repair Small Wood Sash Cracks With Epoxy
Small cracks in solid wood often respond well to a two-part exterior-grade epoxy repair. First, widen the crack slightly when necessary so the repair compound can penetrate properly. Then remove dust completely because contamination can weaken the bond.
Choose an epoxy designed for exterior wood exposure and follow its mixing instructions precisely. Work the compound into the crack using a narrow applicator or suitable putty knife. Next, remove excess material while keeping the surrounding sash profile intact.
Allow the repair to cure according to the manufacturer’s instructions before sanding. Afterward, sand the repaired area gradually until it matches the original surface. Finally, prime the exposed wood and apply a compatible exterior finish.
Do not use ordinary interior wood filler for a Chicago exterior sash. Seasonal moisture can cause unsuitable fillers to crack, shrink, or detach. Instead, select a repair product designed for movement, moisture, and exterior temperature changes.
Before reinstalling the sash, inspect the repaired section from several angles. The repair should feel solid without creating a raised ridge or sharp transition. Additionally, confirm that the sash remains square and fits its opening correctly.
Fix Loose or Split Sash Joints
Many sash cracks originate from loose joints rather than the wood itself. When joints separate, the frame can rack out of square and stress surrounding components. Therefore, repair the joint before filling cosmetic cracks around it.
Remove failing adhesive and carefully clean the joint surfaces. Apply an appropriate exterior wood adhesive when the joint retains enough sound material. Then clamp the frame gently while maintaining its original square shape.
Check both diagonal measurements before the adhesive fully cures. Equal measurements usually indicate that the sash sits square within its rectangular frame. If the measurements differ significantly, adjust the clamps before the adhesive sets.
For severely damaged joints, a professional may use mechanical reinforcement or partial wood replacement. Such repairs preserve more original material than replacing an entire historic sash. In addition, accurate joinery can prevent repeated cracking around the same location.
Replace Rotten or Severely Damaged Sash Material
Epoxy cannot restore wood that has lost most of its structural fibers. Probe suspicious areas with a small tool and compare firm wood against soft sections. If the tool sinks easily, investigate the surrounding area for hidden decay.
Remove only unsound material when practical, then splice in matching replacement wood. The replacement piece should match the original grain direction and exterior exposure characteristics. Afterward, seal joints carefully to reduce future moisture entry.
For extensive deterioration, replacing the sash may provide a safer and more economical result. However, replacement should preserve the window’s dimensions, operation, and architectural character whenever possible. This approach becomes especially important in older Chicago properties with distinctive original windows.
Before choosing replacement, consider whether the damage comes from a leaking exterior detail. A new sash will deteriorate again if water continues entering through failed flashing or surrounding masonry. Consequently, investigate the source instead of treating the sash as an isolated problem.
Protect the Repair From Chicago Weather
A durable sash repair depends on controlling water before it reaches vulnerable wood. Inspect exterior caulking, glazing, drip edges, and nearby masonry for openings. Also, check whether gutters or downspouts direct water toward the window.
Chicago winters create repeated freezing and thawing that can exploit small openings. Water enters a crack, freezes, expands, and places additional stress on surrounding material. Therefore, seal appropriate exterior joints after completing the structural repair.
Good custom window coverings energy planning can also improve indoor comfort. However, coverings should complement proper sash sealing rather than hide unresolved leaks. Repair the window first, then improve insulation and interior comfort.
Do not seal drainage paths that intentionally allow moisture to escape. Windows need controlled drainage to prevent trapped water inside the frame. If you cannot identify the drainage design, consult an experienced window professional before applying sealant.
Rebalance and Test the Repaired Sash
After completing the repair, reinstall the sash carefully and test its movement. It should remain at different positions without falling or drifting unexpectedly. If it drops, the counterbalance system may need adjustment.
Traditional wood windows often use sash cords and weights, while newer systems may use springs. Inspect these components for wear, fraying, corrosion, or broken connections. Replace damaged hardware instead of compensating by forcing the sash into position.
Next, close the window and check the meeting rails for even contact. Uneven contact can indicate warping, poor alignment, or excessive repair material. Correct these problems before applying final paint or finishing coats.
Finally, test the latch and inspect the perimeter seal. A properly repaired sash should close securely without excessive force. The goal involves smooth operation, reliable weather resistance, and preserved frame alignment.
Choose Window Treatments Without Hiding Problems
Interior window treatments can improve comfort, privacy, and daylight control after structural repairs. However, they should never conceal condensation, water staining, or deteriorating sash material. Address the underlying defect before installing a permanent treatment.
If you need to update an older covering, review practical guidance on wood window colours on trend. Coordinating the finish with the repaired sash can make restoration look intentional. Nevertheless, appearance should follow structural integrity rather than replace it.
When removing old blinds, work carefully around the repaired frame and its hardware. Avoid pulling brackets against fragile wood because concentrated force can reopen a repaired crack. For safer removal, follow guidance about how to remove spring loaded brackets.
Know When Professional Sash Repair Makes Sense
Some cracked sashes require more than a straightforward DIY repair. Call a qualified professional when the sash carries heavy glass, shows major distortion, or contains extensive rot. Professional evaluation also makes sense when the window belongs to a historically significant property.
Seek assistance if the window binds despite correct alignment and clean tracks. Persistent binding can indicate structural movement rather than a simple surface defect. Similarly, repeated cracking often signals moisture problems, foundation movement, or failed surrounding components.
Historic Chicago windows deserve particular care because original materials and profiles can carry architectural value. Replacing an original sash without assessment may remove repairable material unnecessarily. A restoration specialist can often preserve significant components while improving performance.
Safety also matters when working from upper floors or exterior elevations. Do not lean outside a window or use unstable equipment to reach difficult areas. Instead, use appropriate access equipment or hire a professional with suitable safety procedures.
A Practical Sash Repair Decision Guide
Use the damage pattern to choose the least invasive solution that restores strength. A shallow stable crack usually needs preparation, epoxy, sanding, and refinishing. A separated joint needs structural realignment before cosmetic filling.
Soft or rotten wood requires material removal and replacement rather than surface filler. Severe distortion may justify complete sash replacement after checking the surrounding opening. Meanwhile, recurring damage requires investigation of moisture and building conditions.
Consider these repair paths:
- Surface crack: Clean, fill, sand, prime, and refinish.
- Open joint: Realign, bond, clamp, and verify squareness.
- Localized rot: Remove unsound wood and splice matching material.
- Severe deterioration: Replace the sash or consult a restoration specialist.
- Cracked glass: Stabilize the sash and replace the damaged pane safely.
- Recurring damage: Find and correct the moisture source before refinishing.
This decision process prevents unnecessary replacement while keeping safety and durability at the center. Above all, match the repair technique to the actual failure rather than the visible symptom.
How to Prevent Future Sash Cracks
Prevention starts with regular inspection rather than emergency repair. Check painted surfaces, joints, glazing, seals, and drainage areas at least twice each year. Spring and fall inspections work well because they reveal seasonal damage early.
Keep exterior finishes intact because paint protects exposed wood from repeated moisture exposure. Touch up failed coatings before bare wood remains exposed for extended periods. Also, keep window tracks clean so operating forces remain low.
Control indoor humidity when condensation repeatedly forms on the window. Persistent condensation can affect wood components and surrounding finishes. Therefore, ventilation and humidity management should accompany exterior maintenance.
Finally, never force a stuck sash. Excessive pressure can split joints, damage hardware, and distort the frame. Instead, identify whether paint buildup, swelling, debris, or hardware failure causes the resistance.
When Is Sash Replacement Better Than Repair?
Replacement becomes reasonable when the sash has widespread rot, major distortion, or repeated structural failures. It also makes sense when repair costs approach the price of a suitable replacement sash. However, compare performance, appearance, and long-term maintenance before deciding.
For older windows, preserve original components whenever their condition allows practical restoration. Original wood may outperform poor replacement material when properly repaired and maintained. Additionally, retaining existing dimensions can simplify installation and preserve the building’s character.
Ask a contractor to explain exactly why replacement is necessary. Request photographs of damaged areas and a clear description of the proposed repair. This information helps you distinguish essential structural work from optional upgrades.
Final Steps for a Durable Chicago Sash Repair
A cracked sash deserves prompt attention because small failures can become expensive seasonal problems. Start with inspection, repair the structural damage, control moisture, and finish the surface properly. Then test the sash repeatedly before considering the project complete.
If you can safely repair a localized wood crack, careful preparation and exterior-grade materials often provide excellent results. For major rot, severe distortion, fragile glass, or historic windows, professional restoration offers greater protection. Most importantly, fix the cause of the damage instead of repeatedly treating the same crack.
Ready to repair a cracked sash? Inspect the window today, document the damage, and choose the least invasive solution that restores safe operation. If structural damage extends beyond a simple repair, contact a qualified window restoration professional for an on-site assessment.
Frequently Asked Questions
Can I repair a cracked wooden sash myself?
Yes, small stable cracks can often receive a durable epoxy repair when the surrounding wood remains structurally sound.
What causes window sashes to crack?
Moisture, seasonal expansion, shrinking wood, loose joints, impact, and excessive operating force commonly cause sash cracks.
Should I replace a sash with rotten wood?
Replace severely rotten sections or the entire sash when deterioration compromises structural strength or safe window operation.
Can Chicago weather make sash cracks worse?
Yes, repeated moisture exposure and freezing temperatures can expand existing defects and accelerate wood deterioration.
When should I hire a professional?
Hire a professional when the sash has extensive rot, major distortion, fragile glass, difficult access, or historic significance.