Installing a Starlink satellite dish on your roof requires careful attention to waterproofing and structural integrity. Many homeowners turn to professional services like Roof Master Construction to ensure proper installation and avoid costly water damage. However, selecting the right roof sealant remains crucial for long-term protection against the elements.
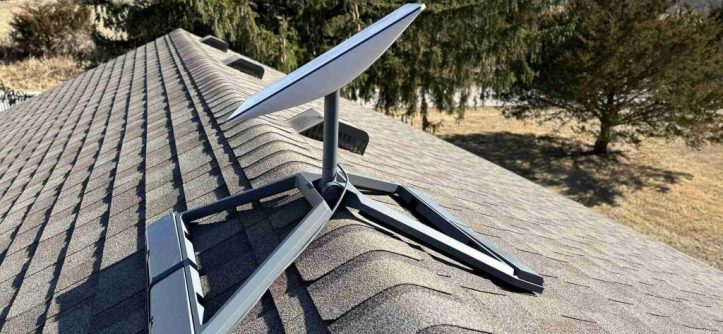
The success of your satellite internet setup depends heavily on proper sealing techniques. When considering a starlink roof mount setup, waterproof sealing becomes the most critical factor in preventing leaks and maintaining your home’s structural integrity. Additionally, the right sealant choice can extend the lifespan of both your roof and your Starlink equipment.
Weather conditions, roof materials, and mounting methods all influence sealant selection. Therefore, understanding the available options helps homeowners make informed decisions about their satellite installation projects.
Understanding Roof Sealant Types for Starlink Installations
Different sealant materials offer varying levels of protection and durability. Silicone-based sealants provide excellent flexibility and weather resistance, making them popular for satellite installations. However, polyurethane sealants offer superior adhesion to most roofing materials and maintain their integrity under extreme temperature fluctuations.
Butyl rubber sealants represent another viable option for Starlink mounts. These sealants remain pliable over time and create excellent watertight seals around mounting hardware. Additionally, they resist UV degradation better than many alternatives, ensuring long-term performance in outdoor applications.
Acrylic sealants, while cost-effective, generally provide shorter lifespans than silicone or polyurethane options. Therefore, most professionals recommend avoiding acrylic products for critical waterproofing applications like satellite dish installations.
Top Roof Sealant Products for Starlink Mounts
Dicor Self-Leveling Lap Sealant
This professional-grade sealant excels in satellite installations due to its self-leveling properties. The product flows smoothly around mounting hardware, creating seamless waterproof barriers. Furthermore, its white color reflects heat, reducing thermal stress on both the sealant and surrounding roofing materials.
The Dicor formula maintains flexibility across wide temperature ranges. Consequently, it accommodates roof expansion and contraction without cracking or losing adhesion. Installation requires minimal surface preparation, making it accessible for DIY enthusiasts.
3M Marine Adhesive Sealant 5200
Originally designed for marine applications, this polyurethane sealant provides exceptional durability in harsh weather conditions. Its superior adhesion properties work well with various roofing materials, including metal, asphalt shingles, and tile. However, removal becomes challenging once cured, requiring careful consideration before application.
The 5200 formula resists saltwater, UV rays, and temperature extremes. Therefore, it performs exceptionally well in coastal environments where traditional sealants might fail prematurely. Professional installers often choose this product for permanent satellite installations.
Geocel Pro Flex Crystal Clear Sealant
This clear sealant offers aesthetic advantages while maintaining excellent waterproofing properties. Its transparency makes it ideal for installations where sealant visibility might affect curb appeal. Additionally, the product remains permanently flexible, accommodating structural movement without compromising the seal.
The Pro Flex formula adheres well to wet surfaces, simplifying installation during less-than-ideal weather conditions. Moreover, its paintable surface allows for color matching with existing roof materials when desired.
Application Techniques for Maximum Effectiveness
Proper surface preparation significantly impacts sealant performance. Clean mounting areas thoroughly, removing dirt, debris, and loose roofing materials. Additionally, ensure surfaces are completely dry before applying sealant, as moisture can prevent proper adhesion.
Temperature considerations affect application success. Most sealants perform best when applied between 40°F and 100°F. However, extreme temperatures can cause premature curing or poor flow characteristics. Therefore, plan installations during moderate weather conditions whenever possible.
Creating consistent bead thickness ensures uniform protection around mounting hardware. Use masking tape to define clean edges and remove excess material before curing begins. Furthermore, tool the sealant surface to eliminate air bubbles and create smooth transitions with surrounding materials.
Common Mistakes to Avoid During Installation
Insufficient sealant coverage represents the most frequent installation error. Many homeowners underestimate the amount needed to create effective waterproof barriers. Consequently, thin applications often fail prematurely, allowing water penetration around mounting points.
Using incompatible materials can compromise long-term performance. Some sealants react poorly with certain roofing materials or existing caulks. Therefore, research compatibility before beginning installation or consult with roofing professionals for guidance.
Rushing the curing process frequently leads to seal failures. Most sealants require 24-48 hours for complete curing, depending on temperature and humidity conditions. Additionally, protecting fresh applications from rain or debris during this period ensures optimal performance.
Maintenance and Inspection Guidelines
Regular inspections help identify potential problems before they cause significant damage. Examine sealant conditions at least twice yearly, particularly after severe weather events. Look for cracks, gaps, or areas where the sealant has pulled away from surfaces.
UV exposure gradually degrades most sealant materials over time. However, quality products typically maintain effectiveness for 10-15 years with proper application. Plan for periodic resealing as part of routine roof maintenance to prevent water damage.
According to Consumer Reports, regular roof maintenance can prevent up to 95% of weather-related damage, making inspection schedules crucial for homeowner protection.
Weather monitoring helps predict when maintenance might be needed. Extreme temperature swings, heavy precipitation, and high winds can stress sealant materials. Therefore, schedule inspections following significant weather events to ensure continued protection.
Professional Installation vs. DIY Considerations
Complex roof configurations often require professional expertise to ensure proper waterproofing. Multi-level roofs, unusual materials, or challenging access points may exceed typical DIY capabilities. Additionally, warranty considerations might influence the decision between professional and self-installation.
Safety concerns represent another important factor in installation decisions. Roof work involves inherent risks that require proper equipment and experience. Furthermore, insurance policies might not cover damage resulting from improper DIY installations.
Cost comparisons should include long-term implications beyond initial expenses. Professional installations typically include warranties and ongoing support that can offset higher upfront costs. However, experienced DIY enthusiasts can achieve excellent results with careful preparation and quality materials.
Conclusion
Selecting the best roof sealant for Starlink mounts requires careful consideration of climate conditions, roof materials, and installation requirements. Quality sealants like Dicor Self-Leveling, 3M Marine Adhesive 5200, and Geocel Pro Flex offer reliable protection when properly applied. However, success depends on thorough surface preparation, correct application techniques, and regular maintenance schedules.
Professional installation services provide expertise and warranties that justify their costs for many homeowners. Additionally, they ensure compliance with local building codes and manufacturer requirements. Whether choosing DIY or professional installation, investing in quality sealant materials protects both your home and your satellite internet investment for years to come.
Frequently Asked Questions
What is the best sealant for metal roofs with Starlink installations?
Polyurethane sealants like 3M Marine Adhesive 5200 work exceptionally well on metal roofing materials. They provide superior adhesion and maintain flexibility across wide temperature ranges, preventing thermal stress failures common with rigid sealants.
How long does roof sealant last around satellite mounts?
Quality sealants typically last 10-15 years with proper application and maintenance. However, extreme weather conditions, UV exposure, and installation quality can significantly impact longevity. Regular inspections help identify when resealing becomes necessary.
Can I install Starlink sealant in cold weather?
Most sealants require temperatures above 40°F for proper application and curing. Cold weather can prevent proper flow and adhesion, leading to premature failures. Plan installations during moderate temperature periods for best results.
Do I need special tools for applying roof sealant around Starlink mounts?
Basic tools include caulk guns, putty knives, and cleaning supplies. However, proper safety equipment like harnesses and non-slip shoes are essential for roof work. Additionally, masking tape helps create clean, professional-looking installations.
How much sealant do I need for a typical Starlink installation?
Most installations require 1-2 tubes of sealant, depending on mount size and roof complexity. Purchase extra material to ensure complete coverage, as running short during application can compromise waterproofing effectiveness. Additionally, having extra sealant available helps with future maintenance needs.