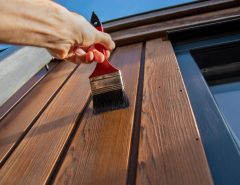
Introduction
Imagine this: A small gap around your garage door could be costing you hundreds in energy bills each year. That tiny oversight in weatherstripping might seem minor, but it’s letting in cold air, hot drafts, and unwanted guests like dust and pests. Weatherstripping is the unsung hero of your garage door—a flexible seal made from materials like rubber, vinyl, or foam that fills gaps between the door and frame, creating a tight barrier against the elements.
Why does this matter? Proper weatherstripping and garage door insulation go hand-in-hand to boost energy efficiency, keeping your home’s temperature stable and reducing strain on your HVAC system. You’ll enjoy a quieter garage, better comfort if it’s attached to your home, and even protection for stored items like tools or vehicles. Plus, it’s a straightforward DIY project that can save you money on professional repairs.
If you’ve noticed drafts sneaking in during winter or skyrocketing utility bills, it might be time for a refresh. In this guide, we’ll walk you through how to replace weatherstripping on your garage door, spot the warning signs, and layer on extra insulation tips. By the end, you’ll have a cozier, more efficient garage without breaking the bank.
Why Weatherstripping Matters for Garage Doors
Your garage door isn’t just an entry point—it’s a massive barrier that covers up to 200 square feet of your home’s exterior. Without effective weatherstripping, it’s like leaving a window cracked open year-round. This simple seal prevents air leaks that force your heating and cooling systems to work overtime, potentially hiking your energy costs by 10-20%.
Beyond efficiency, weatherstripping blocks dust, pollen, and pests from invading your space, keeping your garage cleaner and healthier. It also stops water infiltration during rainstorms, protecting your floor and foundation from moisture damage. For garages attached to your home, maintaining consistent temperatures means less cold air seeping into living areas, which reduces wear on your central HVAC unit.
Don’t overlook the noise factor: A well-sealed door muffles street sounds and wind howls, creating a more peaceful environment for hobbies or workouts. In essence, investing in quality weatherstripping adds durability to your garage door, extending its lifespan and safeguarding your property’s value. It’s a small upgrade with big returns on comfort and savings.
Signs Your Garage Door Needs New Weatherstripping
Over time, even the toughest weatherstripping succumbs to sun exposure, temperature swings, and daily use. Spotting issues early can prevent bigger problems like mold or structural wear.
Here are the telltale signs it’s time for replacement:
- Drafts or light visible around the door edges: Shine a flashlight from inside the garage at night—if light leaks through, air is following suit.
- Cracked, brittle, or compressed rubber seal: UV rays and age make seals harden and shrink, losing their flexibility.
- Increased energy bills or uncomfortable indoor temperature: If your garage feels like a wind tunnel despite the thermostat, seals are likely failing.
- Water, dirt, or insects entering the garage: Puddles near the door or unexplained critters point to gaps.
For a quick self-assessment, use this checklist:
- Park your car inside and close the door—do you feel air movement?
- Run your hand along the edges; is it warmer or cooler than the door itself?
- Check for visible wear: cracks, tears, or flattening.
- Test with a dollar bill: Close the door on it—does it pull out easily?
If you check more than two boxes, grab your tools and get ready to DIY. Addressing these signs promptly keeps your home efficient and inviting.
Tools and Materials You’ll Need
Replacing garage door weatherstripping is a beginner-friendly project that takes about 1-2 hours. Stock up on basics to make it smooth sailing. Here’s your essential kit:
- Measuring tape: For precise cuts to avoid waste.
- Utility knife or heavy-duty scissors: To trim the new strips cleanly.
- Flathead screwdriver or pry bar: For gently removing old seals without damaging the door.
- Replacement weatherstripping: Get a kit with bottom, top, and side pieces—rubber or vinyl works best for durability.
- Nails, screws, adhesive, hammer, or drill: Secure everything firmly; galvanized fasteners resist rust.
- Optional: Silicone spray or sealant: For lubrication and filling tiny gaps.
Pro tip: Universal garage door seals are widely available at home improvement stores like Home Depot or Lowe’s, often in kits tailored to standard sizes (e.g., for 7- or 8-foot doors). Opt for EPDM rubber for weather resistance—it withstands -40°F to 250°F without cracking. Budget $20-50 for materials, and you’re set.
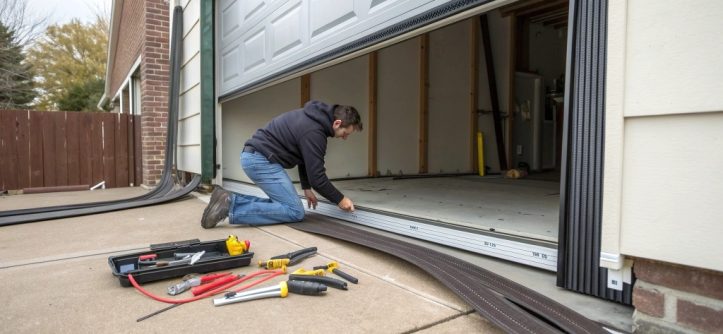
Step-by-Step Guide to Replacing Garage Door Weatherstripping
Ready to roll up your sleeves? Follow this detailed walkthrough for a pro-level install. Disconnect the garage door opener for safety, and work with a helper if your door is heavy.
Step 1: Inspect the Old Weatherstripping
Start by opening the garage door fully. Examine all contact points: the bottom sweep (the U- or T-shaped seal at the base), top seal (along the header), and side tracks (vertical jamb seals). Note the material—vinyl is common but brittle; rubber holds up better. Look for uneven wear or missing sections. This inspection ensures you buy the right replacements and reveals any frame damage that needs to be fixed first.
Step 2: Remove the Old Weatherstripping
Raise the door a few inches to relieve tension, then use your pry bar or screwdriver to gently lift and peel away the old strip from its track or retainer. Work from one end to the other, avoiding forceful yanks that could dent the door. Once removed, wipe the channel clean with a rag and mild soap solution to remove debris, old adhesive, or grime. Let it dry fully— a clean surface is key for a snug fit.
Step 3: Measure and Cut the New Weatherstripping
Accuracy here prevents leaks. Use your measuring tape to get the exact length of each section: bottom (door width plus 1-2 inches overhang), sides (door height), and top (matching width). Mark your cuts with a pencil, then score and slice with the utility knife on a stable surface. For bulb-style seals, ensure the “bulb” faces outward to compress against the frame. Double-check measurements—it’s easier to trim excess than add more.
Step 4: Install the New Weatherstripping
Begin with the bottom seal: Slide it into the retainer’s bottom lip, ensuring the flexible flap angles down for ground contact. If it’s a screw-in type, drill pilot holes and secure every 12 inches. For sides, insert into the vertical tracks, aligning the seal to hug the door’s edge—press firmly or nail/screw as needed. Top seals go into the header channel, overlapping sides slightly. Close and open the door several times to verify smooth operation; adjust if it binds.
Step 5: Seal Gaps and Apply Finishing Touches
Spot any pinprick gaps? Fill them with clear silicone sealant, smoothing with a finger for a watertight bond—let it cure for 24 hours. Finally, spritz silicone lubricant on hinges, rollers, and tracks to keep everything gliding effortlessly. Reconnect the opener, and test the full cycle. Your door should now seal like new, blocking out the world.
How to Improve Garage Door Insulation Further
Replacing weatherstripping is a great start, but layering on insulation amplifies the benefits. For uninsulated metal doors (common in older homes), R-value (thermal resistance) can be as low as R-0.5—upgrading to R-10 or higher slashes heat loss by up to 50%.
- Add insulation panels or foam boards: Cut rigid polystyrene or polyisocyanurate panels to fit the door’s interior panels, securing with adhesive or clips. These DIY kits cost $50-100 and install in an afternoon.
- Use weatherproof caulk around frame joints: Seal cracks in the door frame with exterior-grade caulk to stop sneaky air paths.
- Upgrade to an insulated garage door: If yours is single-layer steel, consider a sandwich-style door with polyurethane foam core—expect $800-2,000, but rebates may apply via energy programs.
- Consider adding door thresholds and insulated side kits: A rubber threshold raises the floor seal, while side kits add foam to jambs for full perimeter protection.
These tweaks create a fortress against energy waste, ideal for workshops or home gyms.
Maintenance Tips for Long-Lasting Seals
A fresh install is only as good as your upkeep. Follow these habits to extend seal life to 5-10 years:
- Inspect every 6–12 months: Spring and fall are prime times—check for wear before seasons shift.
- Keep seals clean and dry: Hose off dirt gently; avoid high-pressure washers that can dislodge them.
- Reapply silicone or adhesive if gaps appear: A quick touch-up prevents minor issues from worsening.
- Replace damaged sections promptly: Patch kits let you swap just the bad spot, saving time and money.
Regular care means fewer headaches and sustained efficiency.
Common Mistakes to Avoid
Even seasoned DIYers slip up—here’s how to sidestep pitfalls:
- Using the wrong size or type of seal: Always match your door’s model; mismatched seals leak or bind.
- Over-tightening screws causes seal distortion: Snug is enough—too tight warps the rubber.
- Ignoring top and side seals while only replacing the bottom one: Air leaks from above or sides undermine your efforts.
- Failing to test the door’s balance after installation: Uneven seals can strain the opener; adjust springs if needed (or call a pro).
Steer clear, and you’ll nail a flawless result.
Benefits of Replacing Weatherstripping and Insulation
The payoff? Transformative. Here’s what you’ll gain:
- Lower heating and cooling costs: Seal leaks to cut energy use by 15-30%, per ENERGY STAR estimates.
- Enhanced comfort in attached garages: No more chilly floors or stuffy summers—enjoy year-round usability.
- Protection against weather damage and pests: Keep out rain rot and bugs for a pristine space.
- Increased property value and garage durability: Efficient upgrades appeal to buyers, adding curb appeal.
It’s an investment that pays dividends in savings and serenity.
Conclusion & Call to Action
From blocking drafts to boosting efficiency, replacing your garage door weatherstripping and adding insulation is a game-changer for any homeowner. We’ve covered the why, the signs, the how-to, and the extras to keep your setup top-notch. Remember, a well-sealed door isn’t just functional—it’s a shield for your home’s comfort and wallet.
Don’t wait for the next cold draft or surprise energy spike. Grab your tools, inspect today, and upgrade your garage’s weatherstripping for better comfort and efficiency. Your future self (and lower bills) will thank you. Share your DIY wins in the comments—what’s your next home project?
FAQs
How Often Should I Replace Garage Door Weatherstripping?
Most seals last 3-5 years in harsh climates, but inspected annually. Replace if you spot cracks or leaks to maintain performance.
What’s the Best Material for Garage Door Insulation?
Polyurethane foam offers the highest R-value per inch and won’t sag. For DIY, rigid foam boards are affordable and easy to cut.
Can I Install Weatherstripping Myself or Should I Hire a Pro?
Absolutely DIY if you’re handy—it’s straightforward with our guide. For complex doors or spring adjustments, pros ensure safety for $100-200.
Related Topics
How to Soundproof Your Garage Workspace: A Quiet Haven for Productivity
Avoiding Common Mistakes in Wood Frame Garage Roofing: A DIYer’s Guide