Today here we have discussed the basics of a “V” brake system of a bicycle and how to adjust the bike brakes.
There are a few different components that you need to be aware of. The brake lever, the brake adjustment at the brake lever, the outer cable, the inner cable – which runs through the outer cable up to the brake lever.
First Step: Adjust the V Brakes
First adjusting the V brakes, you want your lever to move from a comfortable position.
The point where the lever starts at can be adjusted on most bicycles via a screw underneath
or on the front side.
Where the lever ends up on a brake-pull, must be somewhere where you can exert force on it, so you can stop the bicycle.
If it’s anywhere other than that, come and see us and we can adjust it for you, or follow this post and learn how to do it yourself.
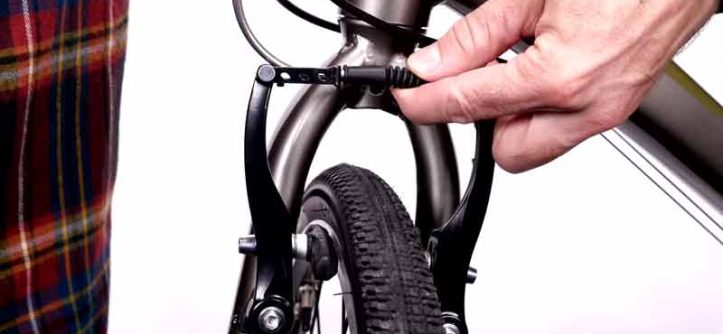
There are two main points of adjustment on a V brake. One is the bolt that does major adjustments on the cable. The second point is the barrel adjuster at the brake lever.
When you pull the brakes, each arm should move at the same rate – they should come and meet the rim at the same time.
Now people love to riding cruiser bikes so it’s important to buy the best cruiser bikes to save yourself from all these problems.
Second Step: Lever Setup
The lever’s going almost all the way to the handlebar, which means that there’ll be no braking until it gets there.
There are two ways to adjust this. If you’re out on the track, you can wind the adjustment barrel.
As you wind it out, it pushes the outer cable and effectively pulls the brakes together. Now you’ve got about half a lever movement and you’ll get braking again.
If that’s occurred, either the cable’s stretched, or it’s fraying (breaking inside), or it’s slipped.
So just be aware with your braking that nothing like that’s occurred. If it’s come loose here, you’d use a 5mm Allen key.
By undoing the Allen key, the cable’s now free to move on the brake arm. By pulling it in and just holding your hand against it, and locking the break up again- locking the bolt up again – now the brake’s fully in. You may also like to read Top 5 Mongoose mountain bike 2022.
Third Step: Wheel Adjustment
So, if you wanted to remove your front wheel, you’d have to disconnect the guide (or “noodle”) from the brake arm.
It’s a simple case of putting a thumb against the brake arm, two fingers inside of the noodle, and a thumb on the back of the noodle.
You do this so you can direct and guide it around. As you push that in, you just clip the holding device off and the brakes will open, thus allowing your front wheel to come out.
The other thing you can see here is the front surface of the braking pad. It’s worth looking at that every now and then and seeing if there’s any aluminum stuck in it or little small pieces of stone.
These will wear your rims away very quickly. To hook it back together, again – two fingers inside the noodle, and a thumb on the back of it.
One thumb on the back of the brake arm. Pull it together and clip the locating device back on again.
That is the easiest way to adjust the bike wheel.
A lot of people just trying to just pull it off just by pulling that way. You’ve got no direction and you can’t actually unhook it.
Fourth Step: Brake Pad Remove and Replacement
Now we are going to show you how to remove a brake pad and replace it with a new one. The first thing you would need to do is un-clip the brakes and open them up.
Most brakes are either a 5mm or a 6mm Allen key – some are also a 10mm spanner. I’m just going to undo this brake lock.
There are several parts on a brake lock when you undo it. There are nuts, washers, conical washers – these all allow the brake block to move around and go flat against the rim.
When you put the brake pad in, make sure on the inside there are two conical washers – which allow it to rotate and move around.
Try to do all tasks carefully and check the brake pad properly.
So, to put a brake in, put it inside and then pull the brake lever. That holds it still for you. So, the brake pad’s staying there because I’m holding the lever in. Just nip it up a little bit.
Conclusion
It’s actually not a difficult task. You could try yourself or you could come into one of our lessons and do it with us. Check the Outdoorxsports, and there is we have given you a complete solution on how to tighten your bike brake.
Thank you for reading our how-to guideline.