Camping in an RV provides a great way to get away from it all and enjoy the outdoors. But the experience can be even better with an RV awning screen room. These handy add-ons provide extra living space, protection from bugs and weather, and increased privacy. Keep reading to learn all about RV awning screen rooms, from what they are to how to choose the right one for your needs.
What is an RV Awning Screen Room?
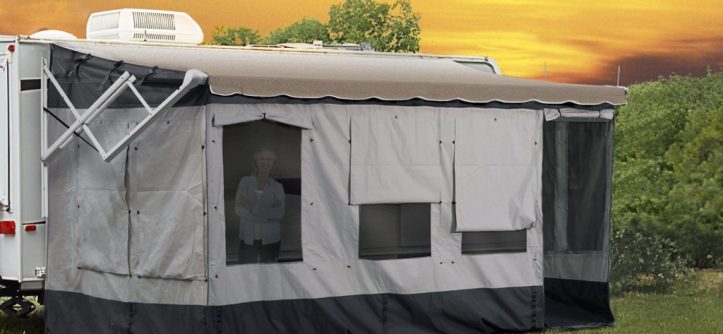
An RV awning screen room is exactly what it sounds like – a screened-in enclosure that attaches to your existing RV awning. It creates an extra “room” off the side of your RV. The screens keep bugs out while still allowing fresh air and views. The roof provides shade and shelter from rain, wind, or harsh sun.
RV awning screen rooms come in a range of sizes, shapes, and materials.
But they all serve the same basic functions:
- Added living area – Gives you more usable space outside your RV.
- Insect protection – Keeps annoying flies, mosquitoes, etc. at bay.
- Weather shielding – Protects from rain, wind, sun, etc.
- Privacy – Provides a private spot for changing clothes, napping, etc.
- Ventilation – Screens allow fresh air flow on stuffy days.
Benefits of an RV Awning Screen Room

There are many advantages to having an awning screen room for your RV:
More Livable Space
One of the best perks of an RV screen room is the extra elbow room it provides. RVs can feel cramped at times. An awning screen room gives you a welcome area to spread out.
Use it for dining, lounging, playing games, etc. You can comfortably seat 4-6 people in most screen rooms. It’s like adding an extra room to your RV!
Protection from Bugs
If you’ve ever tried to enjoy dinner outside while battling mosquitoes, you know the struggle is real. An RV awning screen keeps pests at bay, so you can relax bug-free.
Bug protection is especially important in areas prone to mosquitoes, such as lakes, rivers, and forests. A screen room lets you safely enjoy the outdoors.
Shelter from Weather
No one wants their camping trip ruined by an unexpected rain shower. With an RV screen room, you’ll have a dry refuge if storms pop up.
The roof provides protection from rain, while the screens allow breeze flow so you don’t feel closed in. Side panels or curtains provide privacy and guard against chilly winds.
You can still enjoy the fresh air without being exposed to harsh weather.
Privacy
RV living quarters can get a little cramped when traveling with family or groups. An awning screen room provides a nice private space for changing clothes, napping, or just getting some alone time.
The see-through screens let air and light in while blocking direct views in or out. It’s perfect for kids’ naptime or when you need a break from the group.
Ventilation & Light
RV screen rooms allow air to freely circulate while keeping bugs at bay. This fresh airflow is a welcome relief on hot, stuffy days.
The transparent mesh sides also let in natural light. So you don’t feel totally closed off like you would in a fully enclosed addition.
Versatility
RV screen enclosures can be used in many ways to enhance your camping experience.
Set up foldable chairs and tables to create an outdoor dining room. Lounge on the couch or ground mats for a comfy family hangout. Let the kids play safely while you supervise from inside. Move gear and supplies out for more living space inside the RV.
The possibilities are endless for making the most of your extra screen room!
Types of RV Awning Screen Rooms
There are a few different configurations when it comes to RV awning screen room design:
Standard Style
The most common style is an open-ended design that extends off one end of your awning. It creates a single screened-in space akin to a camping tent.
Standard RV screen rooms range from about 8-14 feet long from the awning to the back wall. The width depends on your awning size. This style offers simplicity and versatility for most RVers.
Porch Style
Porch-style RV screen enclosures are open on both ends rather than just one. This leaves the “porch” area under your awning exposed while enclosing the sides.
Porch screen rooms give you the most airflow and views. However, they provide less weather protection since the awning portion is uncovered.
Half-Enclosed
As the name implies, this style only encloses half the area under your awning. One end connects to the RV while the other end is open.
Half-enclosed screen rooms give you a little more awning coverage than porch versions. But airflow is not quite as free.
Fully Enclosed
Fully enclosed RV screen enclosures cover both the awning area and an additional floorless room. This style gives total weather and bug protection.
The downside is decreased views and airflow compared to other styles. Windows can be added to offset the enclosed feeling.
Awning Screen Room Construction
From framework to fabric, RV awning screen rooms can be built from various materials:
Frame Poles
The framework holding up roof panels and screens may be made of:
- Aluminum – Lightweight but sturdy, resistant to rust.
- Steel – Heavier but very strong, prone to rust over time.
- Fibreglass – Lighter than steel but more durable than aluminum.
Adjustable telescoping poles allow quick setup. Permanently connected poles fold up together when not in use.
Fabric
Several different fabrics are suitable for RV screen room construction:
- Polyester – Lightweight and water-resistant.
- Vinyl – Heavier but very waterproof and durable.
- Mesh – Ultra lightweight screens keep out bugs but not weather.
Fabric panels may feature clear vinyl windows for light, views, and airflow when fully closed.
Doorways
Entryways use zippered screen doors, vinyl flaps, or hybrid styles. Zipper openings allow easy access in and out. Overlapping vinyl seals out the weather but can be opened for ventilation.
Some RVers add aftermarket vinyl stripping around the bottom edges for a tighter seal against wind and rain.
Important Features to Look For
There are a few key considerations when selecting an RV awning screen room:
Correct Sizing
It’s vital to choose a screen enclosure sized specifically for your RV awning dimensions. Ill-fitting rooms will sag, wear out faster, and be prone to damage.
Carefully measure your exact awning size before purchasing. Many brands are adjustable or come in ranges to fit multiple awning widths.
Durable Framework
The tent poles, rods, and structural supports should be made of weather-resistant metal alloys rather than plastic. They need to handle frequent assembly and withstand gusty winds.
Look for sturdy shock-corded fiberglass or aluminum frames. Steel is strong but heavier and can rust.
Waterproof Fabrics
The top, sides, doors, and windows need durable, water-repellent construction. Vinyl and polyester resist moisture better than cheaper nylon.
Sealed seams add further weatherproofing. Reinforced stress points prevent tearing – important in windy conditions.
Secure Anchor System
The screen room must be firmly fixable to the awning roller bar and RV sidewall. Straps should attach at multiple connection points to withstand winds.
Anchor points that clip or pole rather than wrap help quick setup and takedown. Make sure your particular RV model is compatible.
Ventilation Options
Meshed screens allow excellent airflow. For more ventilation look for rooms with:
- Roll up side walls
- Zip open windows
- Flip-up roof flaps
These features prevent a closed-in feeling on hot days.
Before Buying – Measure Your Awning!
This can’t be stressed enough – your new RV awning screen room MUST match the size of your existing awning. Even an inch or two size difference can cause major issues.
Take time to carefully measure the awning length and width before selecting a screen room. Note the following dimensions:
Awning Length
- Measure from the RV wall to the awning roller bar end.
- Round down for a tad extra coverage. Ex. 115″ rounds down to 114″.
- Typical RV awnings are 10-18 feet long.
Awning Width
- Measure across the fully extended awning width.
- Round up slightly for a snug fit. Ex. 76″ rounds up to 78″.
- Usual widths are 6-12 feet across.
Compare your measurements to screen room sizing charts and descriptions. Allow room for poles, sleeves, and hardware.
Ordering the right size avoids headaches! It will fit snugly, function properly, and withstand weather. Taking accurate measurements beforehand ensures your new RV screen room will be a perfect fit.
Installing Your RV Awning Screen Room

The installation process varies slightly based on a specific design. But the general steps are:
1. Attach Top Panel
Start by clipping the roof panel to the awning roller bar. Many use auto-style squeeze clips for tool-free attachment. Wrap-around straps work too.
Center the roof over the awning width. Drape the front flap over the RV wall.
2. Secure Side Panels
Next, attach the side panels to the awning arms using built-in clip straps or loops. Pull the mesh taut edge to edge.
Zip or velcro any doors or windows closed for now.
3. Stake Down Corners
The drive included stakes through bottom loops in each corner. This helps keep the sides square and taught.
Having a partner helps get the corners aligned and staked properly.
4. Insert Frame Poles
Now slide each frame pole through its corresponding fabric sleeve. Attach the hook or pin ends to the grommets at the top and bottom.
Pole sections will snap or telescope together if adjustable length.
5. Re-check Anchors & Seams
Double-check that all top straps, clips, sleeves, and stakes are securely fastened. Sealing any seams/tears with vinyl tape prevents leakage.
Carefully test the stability and access zippers before loading gear or chairs inside.
And that’s it – you now have extra living space to enjoy your RV camping trip in comfort! Reverse the steps when taking the screen room down. With practice, you’ll be set up in minutes.
Maintenance & Care Tips
A well-made RV awning screen room should last for years with proper use. Follow these care tips to get the most life from your screen room:
- Allow mesh sides to air dry thoroughly before packing away to prevent mildew.
- Use a mild soap and water solution to spot-clean clean roof and sides as needed. Never use harsh chemicals.
- Check for tears or seam leaks and repair quickly with vinyl adhesive or tape. This prevents enlarging holes.
- Frequently check that straps and anchors are secure, retightening as necessary.
- Avoid leaving set up in heavy winds, rain, or snow. Clear debris from the roof frequently.
- Let fabric panels air out on sunny days to prevent musty odors.
- Lubricate zippers with silicone spray lube to keep them operating smoothly.
- Limit UV exposure when possible to avoid premature fabric fading.
Proper care means your screen room will last for many camping seasons! Replace damaged parts as needed.
Get the Most from Your Screen Room
Adding an RV awning screen room opens up a whole new world of possibilities! Here are some great ways to utilize your extra space:
- Furnish it with portable chairs, tables, and mats for a lounging and dining area.
- Set up a folding cot or hammock for napping in the shade.
- Let kids play safely within view while you relax inside.
- Store outdoor cooking gear under the awning to free up the interior room.
- Keep pets and their supplies corralled close but out from underfoot.
- Take along a small side table for snacks, drinks, and games.
- Use the privacy for changing clothes after swimming or working out.
- Enjoy sunrise coffees or nightcaps under the stars bug-free!
With a little creativity, you’ll find tons of possibilities with your RV screen room addition. It provides the perfect outdoor oasis anytime you want to enjoy fresh air in total comfort.
Enjoy the Great Outdoors Stress-Free with an RV Screen Room

Spending time outdoors is one of the greatest joys of RV travel. But bugs, unpredictable weather, and lack of privacy can be irritating. Adding an awning screen room enhances the experience by keeping annoyances at bay.
These handy additions create the perfect sheltered oasis outside your RV. More living space, bug protection, and weather shielding let you comfortably enjoy fresh air. Side panels and doors offer seclusion when you need it too.
With a variety of styles and features available, there’s an RV screen room ideal for every rig. Just be sure to precisely measure your awning size before purchasing. A properly fitting screen enclosure will serve you well for seasons of carefree camping ahead!
FAQs
1. How difficult are they to install?
Most RV screen rooms are designed for easy assembly. The process takes about 10-20 minutes with two people. Brands like ADCO and Mongoose use color-coded poles and clip-on straps for simple setups. Just follow the included directions.
2. Can screen rooms be left up in light rain?
It depends on the specific design, but most allow getting caught in a quick shower. Avoid torrential or extended downpours. Close all windows and doors to minimize leakage. Promptly dry out the fabric when the skies clear.
3. How well do they hold up in the wind?
Screen rooms should be taken down in any heavy, sustained winds over 15-20mph. Occasional gusts are generally ok if anchored solidly. Look for models with reinforced stress points and multiple tie-down straps. Pitching where sheltered from wind helps.
4. Can pets be kept in a screen room?
Yes, RV screen enclosures work great as outdoor pet dens. The no-see-um-mesh keeps even tiny insects out while containing your furry friend. Just be sure to bring them inside during bad weather. And provide shade, water, and ventilation for comfort.
5. Are screen rooms really worth the cost?
For most RVers who love lounging outdoors, a screen room is a worthwhile investment. The additional bug-free living area and weather protection add much enjoyment. Plus they can last for years when properly cared for. Just be sure to accurately measure the awning size before buying!
Tags: awning screen room, camper awning screen room, dometic awning screen room, pop up camper awning screen room, retractable awning screen room, rpod awning screen room, sunsetter awning screen room, travel trailer awning screen room