If you are looking to install thin brick on interior walls, there are a few things that you need to know. Thinner bricks can be used as an alternative to drywall because they do not require a lot of space behind them. In addition, they can be installed in places where drywall would not work due to size or shape limitations. The beauty of installing thin brick is that it does not require much work and can be accomplished in less than an hour!
How to install thin brick on interior walls
Thin brick is an excellent alternative to regular brick in home interiors. Thin brick panels are more delicate than standard bricks and are often called “half-bricks” because of their size. They are lighter, easier to install, and more affordable than traditional masonry. However, when installing thin bricks on interior walls, you will need a unique technique that involves more steps than regular bricks.
Measure the area
Before you start, measure the area and ensure it is an appropriate size for your brick. You want to be able to fit a full sheet of brick with no overlap or gaps, so make sure that your measurements allow this. If they don’t work, you’ll need to return them or order a different size.
Once you have measured the space where you want to install your thin brick, check those measurements against the bricks themselves. Just because something fits on paper doesn’t mean that it will look good when installed—make sure that everything will work together before proceeding with installation!
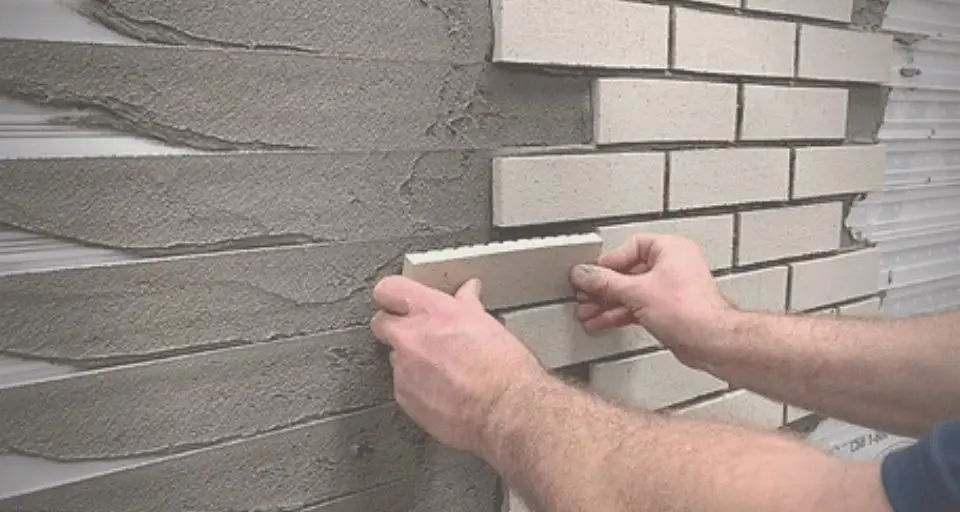
Hold the first piece of thin brick in place
Once your thin brick pieces are cut and ready, it’s time to start installing them. If your wall is perfectly flat, you can skip this step; otherwise, use a level to ensure that each piece of brick is straight and level before marking it with a pencil.
Once the first piece is in place, gently tap it into place using a rubber mallet or hammer. I suppose you’re using thin bricks that are bigger than standard 8″ x 8″, be sure to leave as much space between each thin brick as possible while still ensuring that they line up with each other. This will allow room for expansion and contraction over time without cracking the thin bricks apart, as regular clay bricks would crack under similar circumstances.
Continue along the line, gluing and nailing
Continue along the line, gluing and nailing. The nails will provide added stiffness and protection against water penetration through the joints. Ensure that your nail is at least 1/4 inch from the edge of your thin brick to prevent cracking or chipping later. Use a level to ensure that your thin brick is straight before applying glue or nailing it.
Glue the next row
The second row of bricks is installed in the same manner. Apply a thin layer of mortar to the face of each brick, then press it firmly into position. Use a trowel to spread the mortar evenly over the surface of each brick, ensuring that it is smooth and even.
Don’t apply too much pressure when working with thin bricks when installing them. If you do so, your wall will appear uneven as there may be gaps between some pieces where others are tight against one another.
It’s essential to spread a thin layer of mortar over the thin brick with a trowel so it will be level with the wall. Using too much mortar will create bumps in your thin brick and make them unlevel.
Grout with a 1/4-inch notch trowel
Now that you’ve got your bricks in place, it’s time for the fun part: grouting! You’ll need some grout and a trowel. You can buy premixed or premixed tinted grout or mix your own from dry ingredients. If you want to create a pattern on your wall, like bricklaying does (see the above photo), special tools called spacers are available at hardware stores. This makes laying down individual bricks easier than using just your hands. Apply the grout in 1/4″ broad lines between the bricks using a notched trowel (picture below). Let each line dry before applying another one on top of it, so they don’t run together and form an accidental design element! When all the lines are dry, use a damp sponge to wipe off any excess and stray pieces that may have fallen into other areas while you were working. You don’t want those colors showing through! Let everything set overnight so everything dries entirely before proceeding with painting or staining if desired (if so, wait about 24 hours).
Conclusion
As you can see, installing thin brick on interior walls is a relatively simple process. It’s essential to take the time to measure and mark your spaces accurately so that you can easily place each piece of brick in the correct spot. Once you start building up your walls with mortar and glue, finishing them off with grout will be much easier.