Imagine turning your flat city roof into a cozy spot for barbecues and relaxation. Non-permanent rooftop deck flooring makes this possible without drilling or damaging your roof. You simply place tiles that lock together. These options let water drain underneath. They protect your roof membrane too.
This guide shows you how to do it yourself. You save money and time. Rooftop decks grow popular in urban areas. The global rooftop decking market sees strong growth due to city living and outdoor space needs. Experts predict the commercial part will lead from 2025 to 2033. Urbanization drives this trend.
Government sources stress safety benefits. OSHA notes fall protection rules for roof work. Proper flooring reduces risks. Academic studies show rooftop decks improve building energy use. They cut heat by up to 20% in hot cities. Now, let’s explore your options.
Why Choose Non-Permanent Rooftop Deck Flooring?
Non-permanent flooring fits renters or those who want flexibility. You install it fast. Remove it anytime without harm. It adds value to your home. Enjoy fresh air views without big changes.
Benefits include easy setup. No tools needed beyond basics. It handles weather well. Tiles resist UV rays and rain. You create a safe walking surface.
Consider your roof type. Flat roofs work best. Check load capacity first. Most tiles weigh little. They won’t overload structures.
Statistics back this choice. In dense cities, 70% of new buildings add rooftop spaces. This comes from urban planning reports. It boosts property prices by 10-15%.
Drawbacks exist. Wind can lift loose tiles. Secure them properly. Cost varies by material. Budget $5-15 per square foot.
Think about your needs. Do you want wood look or modern style? Options abound. Next, we cover types.
Types of Non-Permanent Rooftop Deck Flooring
Pick the right type for your space. Each offers unique looks and feels. Start with deck tiles. They snap together easily.

Interlocking Deck Tiles
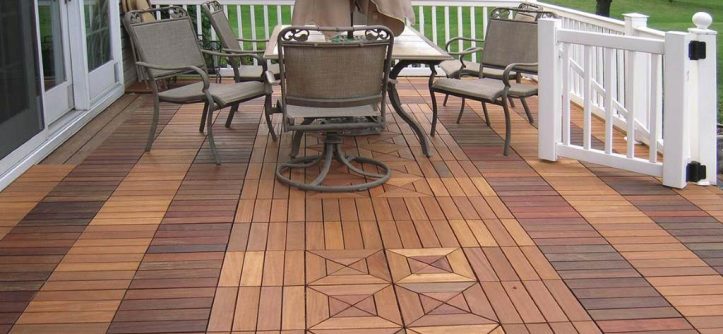
Interlocking deck tiles cover your roof quickly. They use plastic bases with wood or composite tops. Water flows under them.
Pros include simple install. Cons: They may shift in high winds. Use on calm roofs.
You find many styles. Teak gives natural warmth. Plastic versions cost less.
Composite Deck Tiles
Composite deck tiles mix wood fibers and plastic. They last long without rot.
These tiles resist bugs and fade. Install them over concrete or membranes. They lock on all sides.
Pros: Low upkeep. Cons: Higher upfront cost. Ideal for busy owners.
Wood Deck Tiles
Wood deck tiles bring outdoor charm. Ipe or cedar works best for roofs.
They feel warm underfoot. Oil them yearly for protection.
Pros: Beautiful grain. Cons: Needs maintenance. Avoid if you hate chores.
Rubber Pavers
Rubber pavers come from recycled tires. They cushion steps well.
Great for safety. Water drains fast.
Pros: Soft and grippy. Cons: Less stylish. Use in play areas.
Concrete Pavers
Concrete pavers offer solid feel. Place them on supports.
They handle heavy use. Lightweight versions exist.
Pros: Durable. Cons: Heavy. Check roof strength.
Composite Pavers
Composite pavers blend strength and light weight. Brands like Aspire Pavers shine.
They weigh one-third less than concrete. Install on grids.
Pros: Easy lift. Cons: Pricier. Perfect for high-rises.
Stone Deck Tiles
Stone deck tiles add elegance. Porcelain mimics real stone.
They stay cool in sun. Interlocking types available.
Pros: Lux look. Cons: Slippery when wet. Add texture.
Grass Deck Tiles
Grass deck tiles mix green with hard surface. Plastic grids hold fake turf.
Bring nature up high. Water passes through.
Pros: Eco-feel. Cons: Fake grass fades. For low-traffic spots.
Rooftop Deck Flooring with Paver Supports
Paver supports raise tiles. They adjust for slope.
Level your deck perfectly. Use under concrete pavers.
Pros: Fixes uneven roofs. Cons: More parts to buy.
Choose based on budget and style. Measure your space now. Calculate tiles needed.
Pros and Cons of Key Options
Weigh choices carefully. Each has strengths.
- Composite Deck Tiles Pros: Fade-resistant. Bug-proof. Easy clean.
- Cons: Can heat up. Costs $8-12 per sq ft.
- Interlocking Wood Deck Tiles Pros: Natural look. Quick snap. Removable.
- Cons: Oils needed. Warps if wet long.
- Concrete Pavers Pros: Tough. Fire-safe. Long life.
- Cons: Heavy load. Hard to cut.
- Aspire Pavers Pros: Light. Modular. Stain-proof.
- Cons: Newer brand. Less options.
Pick what fits your life. Urban dwellers love low-maintenance picks.
Tools and Materials Needed
Gather items first. Save trips mid-job.
Tools:
- Measuring tape. Check area size.
- Utility knife. Cut tiles.
- Level. Ensure flat lay.
- Rubber mallet. Tap pieces.
- Chalk line. Mark straight edges.
- Safety gear. Gloves, glasses.
Materials:
- Chosen tiles. Order 10% extra.
- Paver supports if needed.
- Adhesive optional. For wind areas.
- Weed mat for grass types.
Budget $200-500 for tools if new. Rent big ones.
Prep your mind. Watch videos. Practice on ground.
Preparing Your Rooftop for Installation
Prep sets success. Start clean.
Clear debris. Sweep roof well. Remove sharp bits.
Check slope. Roofs need 1/4 inch drop per foot. For drainage.
Test load. Walk around. No soft spots.
Clean membrane. Use mild soap. Rinse dry.
Measure twice. Mark corners. Plan layout.
Get permits if required. City rules vary.
Hire inspector for safety. OSHA guidelines apply.
Allow dry time. Wait 48 hours post-clean.
Now, install supports if using pavers.
Step-by-Step Installation Guide
Follow steps closely. Take your time.
Step 1: Plan Layout
Lay tiles dry first. See pattern.
Start corner. Work out. Leave 1/4 inch gaps at edges. For expansion.
Adjust for doors. Keep threshold clear.
Step 2: Install Base Supports
For pavers, place supports. Space every 12 inches.
Adjust height. Use level. Shim if uneven.
For tiles, skip this. They self-level.
Step 3: Place First Row
Snap first tile down. Align edges.
Push next one in. Hear click.
Use mallet if stuck. Tap gently.
Step 4: Build Outward
Continue row by row. Diagonal works best.
Cut edge tiles. Use knife. Follow lines.
Check level often. Adjust supports.
Step 5: Secure Perimeter
Add trim. Screw if windy.
Use adhesive dots. Hold against walls.
Step 6: Final Checks
Walk whole deck. Fix wobbles.
Clean tools. Dispose waste.
Enjoy! Add furniture.
For rooftop deck flooring, interlocking wood deck tiles shine. Composite deck tile options add variety.
Maintenance Tips for Longevity
Keep it looking new. Simple habits help.
Sweep weekly. Remove leaves.
Hose monthly. Mild soap for stains.
Oil wood yearly. Spring best time.
Check tiles. Replace cracked ones.
Avoid chemicals. They harm composites.
In winter, clear snow light. No salt.
Store extras. Shade place.
This extends life 10+ years.
Read Also:
How to Fix a Spongy Feeling Deck: A Step-by-Step Guide
Real Examples
See real wins. Inspire your project.
In New York, a condo used composite deck tiles. They covered 500 sq ft. Install took one day. Owners love low care. Property value rose 12%.
Chicago high-rise picked concrete pavers on supports. Handled wind well. Tenants use for events. No slips reported.
Aspire Pavers in LA rooftop deck. Light weight eased lift. Looks like stone. Maintenance zero.
These show value. Adapt to your spot.
Safety Considerations
Safety first. Protect all.
Install guardrails. OSHA requires at edges.
Use non-slip tiles. Wet roofs danger.
Check weight. Don’t overload.
Wear harness if high. Buddy system.
Light area well. Night use safe.
Teach users rules. No running.
Follow codes. Local fire rules.
This prevents falls. Enjoy worry-free.
Cost Breakdown and Budgeting
Plan money smart. Avoid surprises.
Tiles: $4-15 per sq ft. Composite deck tiles mid-range.
Supports: $2-5 each. For pavers.
Tools: $50-200. Reuse saves.
Labor: DIY free. Pro $5-10 per sq ft.
Total for 200 sq ft: $1,000-4,000.
Shop sales. Bulk buy.
Factor permits. $100-500.
Worth investment. Adds joy.
Conclusion
You now know how to install non-permanent rooftop deck flooring. Options like deck tiles and composite pavers fit needs. Prep, install, maintain for success.
Transform your roof today. Gather tools. Start small if new.
Order materials now. Enjoy outdoor living soon. Share your story!
FAQs
What Are the Best Deck Tiles for Rooftops?
Deck tiles with drainage work best. Interlocking types like composite deck tiles last long. They protect membranes.
How Do I Choose Between Composite and Wood?
Composite needs less care. Wood looks natural but oils often. Pick by upkeep time.
Can I Install Rooftop Deck Flooring Myself?
Yes, if handy. Follow steps. Get help for large areas.
What About Drainage in Rooftop Deck Flooring?
Tiles allow water under. Supports create slope. No puddles.
Are There Eco-Friendly Options?
Yes, recycled rubber pavers. Composite from sustainable sources. Grass deck tiles add green.