Asbestos siding, a common building material in homes built before the 1980s, presents a unique challenge for homeowners looking to refresh their exterior. While the word “asbestos” often triggers alarm bells, it’s crucial to understand that encapsulated, undisturbed asbestos siding is generally not a significant health risk. The danger arises when the material is disturbed, releasing microscopic fibers into the air, which can then be inhaled. However, with proper precautions and a meticulous approach, painting asbestos siding can be a safe and effective way to revitalize your home’s appearance without costly removal.
This comprehensive guide will walk you through each step of the process, from initial assessment to final touch-ups, ensuring your safety and a beautiful, long-lasting finish. We’ll delve into the “why” behind specific safety measures, the “what” of essential materials, and the “how” of practical application, empowering you to tackle this project with confidence.
Why Paint Asbestos Siding Instead of Removing It?
The primary reason many homeowners opt to paint asbestos siding rather than remove it is cost. Asbestos removal is an expensive, highly specialized process that requires certified professionals and adherence to strict regulations. The cost can range from thousands to tens of thousands of dollars, depending on the size of the home and the extent of the asbestos.
Beyond cost, painting offers several other advantages:
- Encapsulation: A fresh coat of paint effectively encapsulates the asbestos fibers, preventing their release into the environment. This acts as a protective barrier, reducing the risk of exposure.
- Aesthetics: Painting dramatically improves the curb appeal of your home, giving it a modern and well-maintained look.
- Protection: Paint provides an additional layer of protection against weathering, moisture, and UV degradation, extending the lifespan of your siding.
- Sustainability: By painting, you’re avoiding the environmental impact associated with disposing of asbestos waste, which often ends up in specialized landfills.
- Increased Home Value: A well-maintained and freshly painted exterior can significantly increase your home’s market value.
Is My Asbestos Siding Safe to Paint?
Before you even think about picking up a paintbrush, a thorough assessment of your existing asbestos siding is paramount. Not all asbestos siding is a candidate for painting.
Examine your siding for:
- Cracks, breaks, or significant damage: If your siding is crumbling, severely cracked, or has large sections missing, painting is not recommended. These issues indicate that the asbestos fibers are already compromised and likely to be released during the painting process. In such cases, professional removal or encapsulation by a licensed contractor is the safest option.
- Friability: Gently touch the siding. Does it feel powdery or easily crumble when touched? This indicates friability, meaning the fibers are loosely bound and easily released. Again, painting is not advisable here.
- Mold or mildew: While treatable, extensive mold or mildew might signify underlying moisture problems that need to be addressed before painting.
If your siding is intact, firm, and shows no signs of significant deterioration, you can proceed with the painting process. If you have any doubts, it’s always best to consult with a qualified asbestos professional for an assessment.
Essential Safety Precautions: Your Non-Negotiables
Safety is not just a recommendation; it’s a requirement when working with asbestos siding. Ignoring these precautions can have serious, long-term health consequences.
Before you begin, gather the following personal protective equipment (PPE):
- NIOSH-approved N-100 or P-100 Respirator: This is non-negotiable. Regular dust masks are insufficient. The N-100 or P-100 rating signifies that the respirator filters at least 99.97% of airborne particles, including asbestos fibers. Ensure a proper fit test for maximum effectiveness.
- Disposable Coveralls: These prevent asbestos fibers from settling on your clothing. Choose coveralls with hoods and elastic cuffs.
- Disposable Gloves: Chemical-resistant gloves (nitrile or latex) protect your hands from paint and potential asbestos contact.
- Safety Glasses or Goggles: Protect your eyes from paint splatters and airborne particles.
- Disposable Boot Covers: Prevent tracking asbestos fibers into your home.
Additionally, implement these site safety measures:
- Isolate the Work Area: Close windows and doors in your home to prevent fibers from entering. Consider using plastic sheeting to seal off openings closest to the work area.
- Notify Neighbors: Inform your neighbors about your project so they can take their own precautions, such as keeping windows closed.
- No Dry Scraping or Sanding: This is critical. Never dry scrape or sand asbestos siding, as this will release a massive amount of fibers.
- Wet Methods Only: All cleaning and preparation must be done using wet methods to keep fibers encapsulated.
- Proper Waste Disposal: Any materials contaminated with asbestos (coveralls, gloves, tarps) must be double-bagged in heavy-duty plastic bags and disposed of according to local regulations for asbestos waste. Contact your local waste management facility for specific guidelines.
Step-by-Step Guide to Painting Asbestos Siding
Step 1: Preparation – The Foundation of a Safe and Lasting Finish
Thorough preparation is the most critical step, ensuring both your safety and the longevity of your paint job.
- Protect Your Surroundings: Lay down heavy-duty plastic sheeting or tarps on the ground around your home. Extend them at least 10 feet out from the foundation to catch any drips or debris. Secure them with painter’s tape or weights.
- Wet Down the Siding: Using a garden hose with a gentle spray nozzle (avoid high-pressure washers, as they can damage the siding and release fibers), thoroughly wet down the entire area you plan to clean. Keep the siding consistently damp throughout the cleaning process.
- Gentle Cleaning: Create a solution of mild detergent (like dish soap) and water. Using a soft-bristle brush or sponge, gently scrub the siding in small sections. Work from top to bottom. The goal is to remove dirt, grime, and any loose paint without aggressively scrubbing or abrading the surface. Rinse each section thoroughly with a gentle spray of water as you go, keeping the surface wet.
- Pro Tip: For stubborn mold or mildew, you can use a solution of 1 part bleach to 3 parts water. Apply with a sponge, let it sit for a few minutes, then rinse thoroughly. Always wear your PPE when using bleach.
- Allow to Dry (Slightly): Let the siding air dry completely. This might take several hours or even a full day, depending on weather conditions. Ensure the surface is dry to the touch before proceeding to priming.
Step 2: Priming – The Adhesion and Sealing Powerhouse
Priming is essential for asbestos siding. It provides a bonding surface for the paint, helps seal any remaining porous areas, and improves the overall durability of your finish.
- Choose the Right Primer: Select a high-quality, 100% acrylic latex primer specifically designed for exterior use. Look for primers that offer excellent adhesion and sealing properties. Some primers are specifically formulated for chalky or porous surfaces, which can be beneficial for older asbestos siding. Avoid oil-based primers, as they can become brittle and crack over time.
- Apply the Primer: Using a roller with a medium nap (3/8″ to 1/2″) and a good-quality exterior paintbrush for trim and hard-to-reach areas, apply a thin, even coat of primer to the entire siding. Work in manageable sections, ensuring complete coverage. Avoid over-applying, as this can lead to drips and uneven drying.
- Technique: Roll in vertical strokes, overlapping each pass slightly to ensure a seamless finish. Use the brush for detailed work around windows, doors, and corners.
- Allow to Dry: Refer to the primer manufacturer’s instructions for drying times. Typically, this will be a few hours. Ensure the primer is completely dry and cured before applying the topcoat.
Related: Choosing the Right Oil-Based Paint: A Homeowner’s Guide to Long-lasting Beauty
Step 3: Painting – The Color and Protection
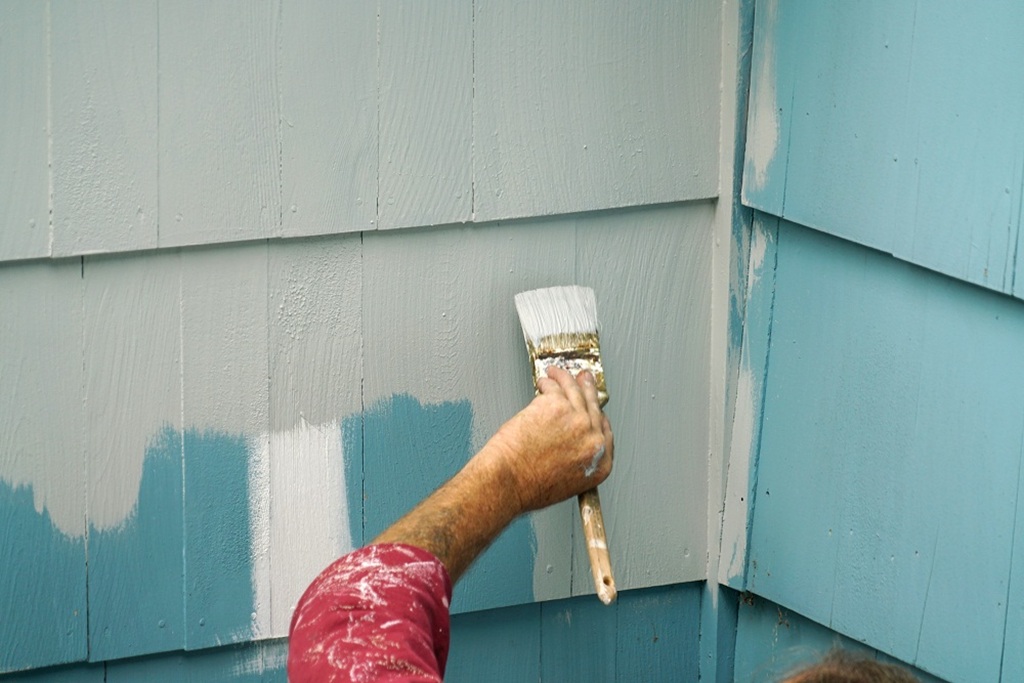
Now for the transformation! Choosing the right paint and applying it correctly will ensure a beautiful and long-lasting finish.
- Select Your Paint: Opt for a high-quality, 100% acrylic latex exterior paint. Acrylic paints are flexible, durable, and resistant to cracking, fading, and mildew, making them ideal for exterior applications. Choose a satin or semi-gloss finish for easier cleaning and enhanced durability.
- Prepare for Painting: Stir the paint thoroughly before and during application. If you’re using multiple gallons, consider “boxing” them by pouring them all into a larger container and mixing them together to ensure color consistency.
- Apply the First Coat: Using a roller with a medium nap and your exterior paintbrush, apply the first coat of paint. Work in sections, maintaining a wet edge to avoid lap marks. Roll from top to bottom, using consistent pressure.
- Coverage: Don’t try to achieve full coverage with the first coat. The goal is an even, thin application.
- Allow to Dry: Allow the first coat to dry completely according to the manufacturer’s instructions (typically 4-6 hours, but can vary with temperature and humidity).
- Apply the Second Coat: Apply a second coat of paint using the same technique as the first. A second coat provides increased durability, better color saturation, and a more uniform finish.
- Allow to Cure: While the paint may feel dry to the touch in a few hours, it takes several days, or even weeks, for the paint to fully cure and reach its maximum hardness and durability. Avoid leaning objects against the newly painted surface during this curing period.
Step 4: Clean-Up and Waste Disposal – The Final, Crucial Step
Proper clean-up is just as important as the painting process itself to ensure no asbestos fibers are inadvertently released.
- Wet Clean-Up: Do not dry sweep or vacuum. Use a wet mop or wet rags to clean up any paint drips or debris on your tarps or surrounding surfaces.
- Dispose of Contaminated Materials: Carefully fold up all plastic sheeting, tarps, and dispose of all used PPE (respirators, coveralls, gloves, boot covers) and paint rollers/brushes that cannot be thoroughly cleaned. Place all these materials into heavy-duty plastic bags. Double-bag them to prevent any accidental tearing or release of fibers.
- Seal and Label: Tightly seal the bags with heavy-duty tape. Clearly label the bags as “ASBESTOS WASTE” to alert waste handlers.
- Contact Local Waste Management: Call your local waste management facility or health department to inquire about specific procedures for disposing of asbestos-contaminated waste in your area. Regulations vary by municipality, and it’s crucial to follow them precisely. Do not put asbestos waste in regular household trash.
- Clean Reusable Tools: Thoroughly clean any reusable tools (e.g., paint trays, roller frames) with soap and water.
Maintaining Your Painted Asbestos Siding
Once your asbestos siding is freshly painted, regular maintenance will help preserve its beauty and integrity.
- Gentle Cleaning: Periodically clean your siding with a soft brush or sponge and a mild detergent solution. Rinse with a gentle spray of water.
- Inspect Regularly: Annually inspect your siding for any signs of damage, cracking, or peeling paint. Address any issues promptly to prevent further deterioration and ensure the continued encapsulation of the asbestos.
- Touch-Ups: Keep a small amount of your paint on hand for minor touch-ups if needed.
Related: The Impact of Professional Commercial Painting on Business Atmospheres
When to Call a Professional
While painting asbestos siding is a DIY project for many, there are situations where professional intervention is necessary:
- Damaged or Friable Siding: If your siding is crumbling, severely damaged, or easily releases fibers, do not attempt to paint it. Contact a certified asbestos abatement contractor.
- Extensive Mold/Moisture Issues: If you suspect widespread moisture problems or significant mold growth that extends beyond the surface, consult with a professional to address the root cause.
- Uncertainty: If you’re unsure about the condition of your siding or feel uncomfortable undertaking the project yourself, err on the side of caution and seek professional advice.
Conclusion
Painting asbestos siding is a viable and cost-effective solution for homeowners looking to update their home’s exterior while safely managing existing asbestos materials. By meticulously following this step-by-step guide, prioritizing safety with appropriate PPE, and employing wet methods for cleaning and preparation, you can achieve a beautiful, durable, and safe finish. Remember, the key is to avoid disturbing the asbestos fibers, ensuring that this renovation project enhances both the aesthetics and the safety of your home for years to come.