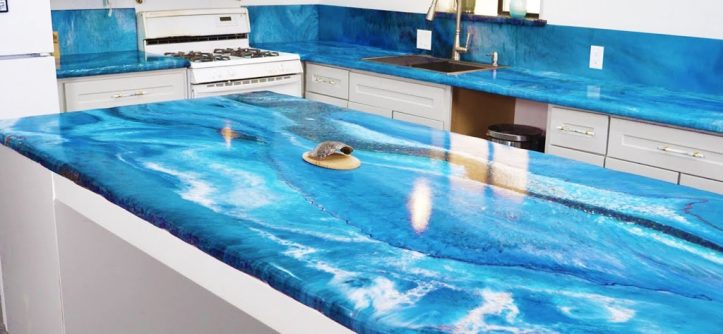
Let’s face it, tired, outdated countertops can drag down the whole look of your kitchen or bathroom. Replacing them often means a hefty price tag and significant disruption. But what if you could achieve a high-end, durable, and glossy finish for a fraction of the cost? Enter epoxy countertop paint – or more accurately, epoxy coating systems. This DIY-friendly solution has exploded in popularity, offering a way to dramatically transform laminate, formica, tile, wood, and even concrete countertops into surfaces that mimic luxurious stone like marble or granite.
But is it really the miracle solution it seems? As with any home improvement project, there are pros, cons, and crucial details to understand before you dive in. This guide will walk you through everything you need to know about using epoxy for your countertops in 2025.
What Exactly is Epoxy Countertop Coating?
First, let’s clarify terminology. While often called “epoxy paint,” it’s more accurately described as an epoxy coating or resin system. Unlike regular paint that simply dries, epoxy undergoes a chemical reaction. It typically consists of two parts: a resin and a hardener. When mixed precisely according to instructions, these components trigger a thermosetting process, curing into an extremely hard, durable, and typically high-gloss solid surface, usually about 1/8 inch thick.
This resulting finish is non-porous, waterproof, and bonds tenaciously to a variety of properly prepared substrates, including:
- Laminate and Formica
- Wood
- Concrete
- Ceramic Tile (grout lines will be filled)
- Metal
The beauty of epoxy is that it creates a brand new, seamless surface right over your existing countertop.
The Allure of Epoxy: Why It’s a Top Choice (The Pros)
Why are so many homeowners turning to epoxy for their countertop renovations? The benefits are compelling:
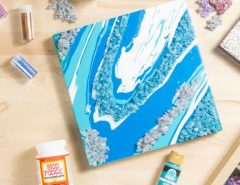
- Stunning Aesthetics: This is arguably epoxy’s biggest draw. It cures to a thick, glossy, almost liquid-like finish that looks incredibly modern and high-end. The real magic lies in its versatility. You can achieve solid colors, or by using pigments, metallic powders, and various pouring techniques, mimic the complex veining of marble, the sparkle of granite, or create entirely unique, artistic designs. You can even embed objects like pebbles or shells for a personalized touch. The seamless finish eliminates grout lines found on tile, offering a sleek, continuous surface.
- Impressive Durability: When properly applied and fully cured, epoxy creates a very hard and resilient surface. It offers excellent resistance to scratches (though not scratch-proof – more on that later) and impacts compared to materials like laminate. It effectively seals and protects the underlying countertop material.
- Heat and Moisture Resistance: Epoxy countertops handle moderate heat quite well. Many high-quality countertop epoxies boast heat resistance up to 470-500°F (around 240-260°C) for incidental contact (always check the manufacturer’s specifications!). This means you likely don’t need to panic about placing a coffee maker or toaster on it. Crucially, it’s non-porous and waterproof, making it ideal for kitchens and bathrooms where spills are common. Liquids won’t soak in and cause damage or staining easily.
- Budget-Friendly Makeover: Compared to the cost of new granite, quartz, or even solid surface countertops, epoxy is significantly more affordable. DIY epoxy kits provide the materials needed for a fraction of the price of replacement, typically costing around $4-$8 per square foot for materials alone. Professional installation is pricier but still often less than new stone.
- Food Safe & Hygienic: Once fully cured (a process that can take up to 30 days), most quality countertop epoxy systems are non-toxic and food safe, making them suitable for food preparation areas. The seamless, non-porous nature also means bacteria, mold, and mildew have nowhere to hide, making the surface easy to clean and maintain.
- DIY Potential: While it requires care and attention to detail, applying epoxy is achievable for many handy homeowners. With thorough preparation and by following instructions carefully, you can get professional-looking results without hiring expensive contractors.
Before You Pour: Important Considerations (The Cons)
While the benefits are attractive, it’s crucial to understand the potential downsides and challenges:
- The Application Challenge: This is not a quick slap-it-on-and-forget-it job.
- Preparation is Non-Negotiable: Success hinges on meticulous surface preparation – cleaning, degreasing, sanding, and sometimes priming are essential for proper adhesion. Skipping steps can lead to failure.
- Mess Factor: Epoxy is fluid (like honey) before it cures and is designed to self-level and drip over the edges. Protecting surrounding cabinets, floors, and appliances thoroughly with plastic sheeting is vital. It can get messy!
- Working Time: Once mixed, you have a limited window (pot life), often just 20-60 minutes, to pour, spread, add effects, and remove bubbles before it starts to harden. You need to work efficiently and decisively.
- Fumes & Safety: While many modern epoxies are low or zero VOC (Volatile Organic Compounds), some still release strong odors during application and curing. Good ventilation (open windows, fans) and appropriate safety gear (gloves, respirator, eye protection) are essential.
- Bubbles: Air bubbles can easily get trapped during mixing and pouring. These must be removed promptly with a heat gun or propane torch for a smooth finish.
- Curing Time: Epoxy takes time to fully cure and reach maximum hardness. While it might be touch-dry in 24 hours, it typically needs 3-7 days before light use and up to 30 days for full cure. Your countertops will be out of commission during this period.
- Durability Isn’t Invincibility:
- Scratches: While scratch-resistant, epoxy is not scratch-proof. Cutting directly on the surface will leave marks. Always use a cutting board. Dragging heavy or abrasive items can also cause scratches.
- Chipping/Cracking: A very heavy impact (like dropping a cast iron pan) can potentially chip or crack the epoxy.
- Heat Limits: Remember, heat resistance isn’t heat proof. Placing a scorching hot pan directly from the stove or oven onto the epoxy can cause melting, burns, rings, or discoloration. Always use trivets or hot pads.
- Staining: Although highly stain-resistant, prolonged exposure to certain substances (like hair dye, potent spices like turmeric, or some harsh chemicals) can potentially cause stains if not wiped up immediately.
- Potential for Yellowing: Over time, especially with significant exposure to direct sunlight (UV rays), some epoxies (particularly clear or white ones) can develop a yellowish tint. Look specifically for formulas with added UV inhibitors (like HALS – Hindered Amine Light Stabilizers) to minimize this.
- Repair Difficulty: If significant damage like a deep scratch or large chip occurs, making an invisible repair is very difficult due to the seamless nature of the finish. Often, the entire surface may need to be lightly sanded and recoated.
- Synthetic Appearance: While it can mimic stone beautifully, some people find the extremely high-gloss finish looks artificial or “plastic” compared to the subtle variations of natural materials. Matte topcoats are available but may alter the look.
Related: Give Your Kitchen New Life: Finding the Best Cabinet Paint in 2025
DIY Epoxy Countertops: A Step-by-Step Guide

Ready to tackle the project? Here’s a general overview of the process. Always follow the specific instructions provided with your chosen epoxy kit.
- Plan & Design: Decide on your desired look. Gather inspiration photos. Consider how base colors affect accent colors (e.g., white bases make colors pop, black bases can dominate).
- Gather Supplies: Get your epoxy kit (calculate amount needed + extra), pigments/powders, safety gear (nitrile gloves, respirator, eye protection), mixing buckets (graduated), stir sticks, notched trowel/spreader, painter’s tape, thick plastic sheeting, level, sandpaper (various grits), tack cloth, isopropyl alcohol or degreaser, primer/undercoat (if recommended), heat gun or propane torch.
- Preparation is Paramount:
- Protect: Cover floors, cabinets, backsplash, sink, etc., meticulously with plastic sheeting and tape. Epoxy will drip!
- Clean & Degrease: Thoroughly clean the existing countertop to remove all grease, grime, and residues. Isopropyl alcohol works well for a final wipe-down.
- Sand: Lightly sand the entire surface (especially glossy laminate or tile) to create microscopic scratches (a “profile”) for the epoxy to grip onto. Use medium-grit sandpaper (e.g., 120-220 grit).
- Clean Again: Wipe away all sanding dust with a tack cloth or damp microfiber cloth. Dust is the enemy of a smooth finish.
- Level Check: Ensure countertops are level. Epoxy self-levels, so any slant will result in an uneven coat. Shim cabinets if necessary.
- Prime (Highly Recommended): Apply a compatible bonding primer or epoxy undercoat. This improves adhesion, prevents issues from the old surface bleeding through, and provides a uniform base color, enhancing your final design. Let it dry completely per instructions.
- Tape Edges: Apply painter’s tape along the underside edge of the countertop to catch drips for easier removal later.
- Mixing the Epoxy:
- Measure Precisely: Carefully measure the resin (Part A) and hardener (Part B) according to the kit’s ratio (usually 1:1 by volume). Inaccurate measuring is a primary cause of curing issues.
- Mix Thoroughly & Slowly: Combine parts in a clean mixing bucket. Mix slowly but deliberately for the recommended time (often 3-5 minutes), scraping the sides and bottom frequently to ensure complete integration. Avoid whipping air into the mixture.
- Add Colors: If using multiple colors, pour the mixed epoxy into smaller containers and thoroughly mix in your pigments or metallic powders.
- The Pour:
- Seal Coat (Optional but Smart): Consider applying a very thin initial coat of clear or base-color epoxy and spreading it with a brush or roller. This seals the porous surface (like wood or concrete) and helps prevent air bubbles from rising later (“outgassing”). Let this get tacky.
- Flood Coat: Pour the main batch of epoxy onto the center of the countertop. Pour in ribbons or patterns depending on your desired effect.
- Spread Evenly: Use the notched trowel held at a 45-degree angle (or spreader) to guide the epoxy evenly across the entire surface, allowing it to flow naturally over the edges. Aim for the recommended thickness (usually 1/8 inch). Use a gloved hand or brush to ensure edges are fully coated.
- Add Effects: Immediately pour or drizzle your accent colors to create veins or patterns. Use stir sticks, notched trowels, or even gloved fingers to manipulate the colors. Be mindful of your limited working time.
- Pop Bubbles: Within 10-15 minutes of pouring, systematically pass a heat gun (on low setting) or propane torch (flame held a few inches above, keep it moving!) across the entire surface. The heat lowers the epoxy’s viscosity, allowing trapped air bubbles to rise and pop. Repeat as needed during the first hour. Don’t overheat or scorch the epoxy.
- Curing:
- Protect from Dust: Keep the area as dust-free as possible while curing. Avoid drafts.
- Wait: Let the epoxy cure undisturbed according to the manufacturer’s timeline. Typically: ~24 hours until tack-free/tape removal, 3-7 days for light use, 30 days for full cure and maximum hardness/resistance. Avoid placing heavy objects or cleaning aggressively before full cure.
- Remove Tape: Carefully remove the drip tape after about 18-24 hours (when tacky but not fully hard).
- Top Coat (Optional but Recommended): For maximum durability and scratch resistance, consider applying a final clear coat of epoxy or a specialized, compatible polyurethane top coat after the main epoxy layer has sufficiently cured (follow manufacturer guidelines). This can also provide a matte or satin finish if desired.
Keeping Your Epoxy Countertops Gleaming (Maintenance)
Epoxy countertops are relatively low-maintenance, but proper care ensures longevity:
- Cleaning: Simple is best. Use mild dish soap and warm water with a soft cloth or sponge for daily cleaning. Non-abrasive, pH-neutral cleaners (like Simple Green Crystal) are also suitable.
- Avoid Abrasives: Never use abrasive cleaners (like Comet, Ajax, Soft Scrub) or scouring pads (steel wool, green scrubbies). These will dull the glossy finish and create micro-scratches over time.
- No Harsh Chemicals: Avoid bleach, ammonia-based cleaners, oven cleaners, or drain cleaners coming into contact with the surface.
- Wipe Spills Promptly: While resistant, don’t let spills (especially coffee, wine, acidic juices, dyes, or oily substances) sit for extended periods. Wipe them up quickly with a damp cloth.
- Protect the Surface:
- Use Cutting Boards: Always use a cutting board. Never cut directly on the epoxy.
- Use Trivets/Hot Pads: Always place hot pots, pans, or dishes on trivets or protective mats. Do not place items directly from the stove or oven onto the epoxy.
- Avoid Dragging: Lift heavy or rough-bottomed objects instead of dragging them across the surface.
- Restoring Shine: If the surface dulls over time, applying a very light coat of food-grade mineral oil with a soft cloth can sometimes restore luster (check kit instructions first). Avoid wax-based polishes, which can build up.
- Dealing with Damage: Minor surface scratches might be buffable with specialized polishing compounds. Deeper scratches or chips are difficult to repair invisibly and may require sanding and recoating the entire surface for a uniform look.
Choosing the Best Epoxy Countertop Kit
With many kits on the market, consider these factors:
- Food Safety: Ensure the product is explicitly stated as food-safe or FDA-compliant for food contact surfaces once fully cured.
- UV Resistance: Look for kits containing UV inhibitors (HALS) to prevent or minimize yellowing, especially for white/light colors or areas with direct sunlight.
- Heat Resistance: Check the specific temperature rating provided by the manufacturer and understand its limitations (incidental vs. prolonged contact).
- VOC Content: Prioritize Zero VOC or low-VOC formulas for safer indoor air quality during application and curing.
- Working Time (Pot Life): Choose a kit with a working time that matches your comfort level and project complexity (longer is often better for beginners).
- Coverage: Carefully calculate your countertop square footage and purchase a kit that provides adequate coverage (usually calculated for a 1/8″ layer), including potential seal coats or top coats. It’s better to have slightly too much than too little.
- Clarity & Finish: Ensure it cures crystal clear (if desired) and offers the gloss level you want (unless using a separate top coat).
- Brand Reputation & Reviews: Research brands like Stone Coat Countertops, FX Poxy, Giani, Leggari, Countertop Epoxy, etc. Read reviews and watch tutorials specific to the kit.
- Kit Contents: Some kits are comprehensive, including pigments, tools, primer, and top coats, while others only provide the resin and hardener.
Related: From Rags to Rugs: Your Ultimate Guide to DIY Rag Rug Making
People Also Ask (FAQs)
-
How long do epoxy countertops last?
With proper installation and care, DIY epoxy countertops can realistically last 10 years or more. Professionally installed, high-quality systems might last 10-20 years. Longevity depends heavily on the quality of the epoxy, the thoroughness of the preparation and application, usage patterns, and maintenance.
-
Is epoxy durable enough for kitchen countertops?
Yes, when done correctly and cared for properly, epoxy is very durable for kitchen use. It resists scratches, impacts, and moisture well. However, it’s not indestructible and requires more care than granite or quartz regarding direct heat and cutting.
-
Can you put hot pans directly on epoxy countertops?
No. While heat-resistant to varying degrees (check specs!), epoxy is not heat-proof. Direct contact with very hot cookware can cause permanent damage like melting, scorching, yellowing, or rings. Always use trivets or hot pads.
-
Is epoxy food safe once cured?
Generally, yes. Most reputable epoxy countertop kits are formulated to be non-toxic and food safe after they have fully cured (which can take up to 30 days). Always verify this claim with the specific product you choose and follow curing instructions meticulously.
-
Does epoxy scratch easily?
It’s scratch-resistant, meaning it holds up well against everyday wear. However, it’s not scratch-proof. Sharp objects like knives will scratch it. Compared to laminate, it’s often more scratch-resistant. Compared to stone like granite, it’s less so. Using cutting boards is essential.
-
How much does it cost to epoxy countertops?
For a DIY project, expect to spend roughly $100 to $350 on materials (epoxy kit, pigments, supplies) for an average-sized kitchen, translating to about $4-$8 per square foot. Professional installation is significantly more, typically ranging from $50 to $150 per square foot, putting the total cost for an average kitchen between $2,000 and $7,000, though complex designs can cost more.
-
Is applying epoxy countertops difficult for a beginner?
It can be challenging and requires a different skillset than painting. Success demands patience, meticulous attention to detail (especially in preparation and mixing), and the ability to work cleanly and efficiently within the pot life. Mistakes like improper mixing or inadequate prep can lead to poor results that are hard to fix. Watching tutorials and even doing a small test piece first is highly recommended for beginners.
Conclusion: Is an Epoxy Countertop Makeover Right for You?
Epoxy countertops offer a fantastic opportunity to achieve a dramatic, high-end aesthetic transformation on a budget. The ability to customize colors and patterns, coupled with its durability (when treated correctly) and hygienic properties, makes it a compelling choice for many homeowners.
However, it’s not a project to be taken lightly. The application process demands careful planning, meticulous preparation, precise execution, and patience during the long curing time. You must also accept its limitations – it requires mindful use regarding heat and cutting, and potential yellowing or repair difficulties are factors to consider.
Ultimately, if you’re a budget-conscious DIYer who enjoys detailed projects, is willing to invest the time in preparation and learning the techniques, and can commit to using cutting boards and trivets, then epoxy countertops can be an incredibly rewarding venture. You’ll get a stunning, unique, and functional surface that breathes new life into your space for years to come. If precision, patience, and careful use aren’t your strengths, professional installation or exploring other countertop materials might be a better fit.