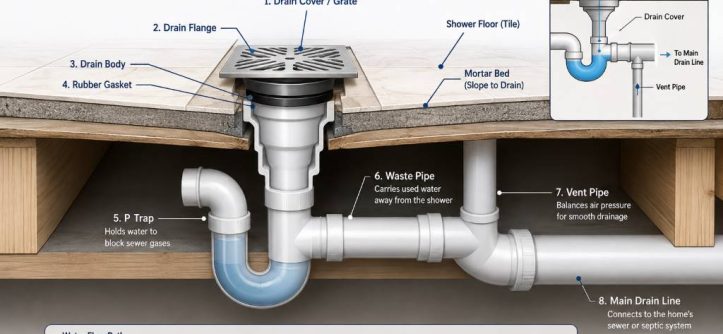
A shower drain pipe diagram shows how every plumbing component connects beneath your shower. It clearly identifies the drain cover, drain body, P trap, waste pipe, vent pipe, and main drain line, making installation and troubleshooting much easier. Understanding this layout helps prevent leaks, slow drainage, and costly plumbing mistakes.
Many homeowners face drain related plumbing issues every year, while clogged drains remain among the most common household plumbing repairs. A simple diagram removes confusion by showing how wastewater flows safely from the shower into the home’s drainage system. This guide explains every important part, common layouts, installation tips, and maintenance advice using clear language for beginners and experienced homeowners alike.
What Is a Shower Drain Pipe Diagram?
A shower drain pipe diagram is a visual plumbing drawing that explains the complete drainage path beneath a shower floor. It helps identify every fitting and connection before installation or repair begins.
Learning the basics becomes easier after reviewing these washing machine drain plumbing tricks because similar drainage principles apply to many household fixtures. Both systems rely on proper slope, venting, and secure pipe connections.
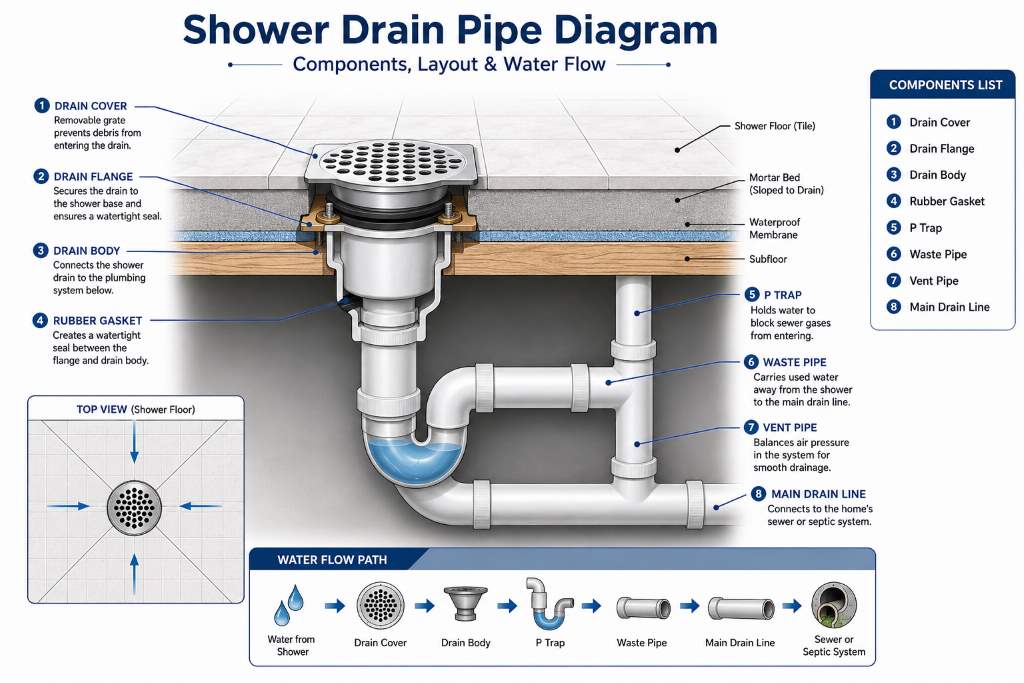
A standard shower drain pipe diagram normally includes the following components.
- Drain cover or grate
- Drain flange
- Drain body
- Rubber gasket
- P trap
- Waste pipe
- Vent pipe
- Main drain line
Main Parts of a Shower Drain System
Drain Cover
The drain cover prevents large debris from entering the plumbing system while allowing water to pass freely. It also improves safety by reducing slipping hazards inside the shower.
Drain Flange
The flange creates a waterproof connection between the shower base and the drain assembly. Proper sealing prevents hidden water damage beneath the flooring.
Drain Body
The drain body connects the shower floor directly to the drainage piping below. It securely joins several plumbing components into one leak resistant assembly.
P Trap
The P trap always holds a small amount of water after every shower. This water seal blocks unpleasant sewer gases from entering the living space.
Waste Pipe
The waste pipe carries used shower water away from the P trap toward the home’s primary drainage system. Correct pipe sizing supports consistent water flow.
Vent Pipe
The vent pipe balances air pressure throughout the plumbing system during drainage. As a result, water flows smoothly without creating suction problems.
Main Drain Line
The main drain line receives wastewater from several plumbing fixtures before directing it toward the municipal sewer or septic system. Good maintenance keeps this pipe operating efficiently.
How a Shower Drain Pipe Diagram Works
Water first enters through the shower drain cover before flowing into the drain body. Next, it passes through the P trap where sewer gases remain blocked.
Understanding complete plumbing layouts becomes much simpler after exploring a residential plumbing blueprint because every fixture follows a connected drainage network. This broader perspective helps identify pipe locations during remodeling projects.
After leaving the trap, wastewater travels through the waste pipe into the main drain line. Meanwhile, the vent pipe maintains balanced airflow for reliable drainage performance.
Common Shower Drain Pipe Configurations
Center Drain Layout
A center drain places the drain opening in the middle of the shower floor. This design creates even floor slopes from every direction.
Linear Drain Layout
Linear drains sit along one shower wall instead of the center. They work especially well with large format tiles and modern bathroom designs.
Offset Drain Layout
An offset drain positions the opening away from the shower center because of existing plumbing. Renovation projects often use this practical arrangement.
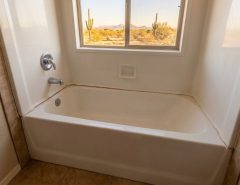
Many homeowners compare layouts with a bathtub drain diagram before renovating bathrooms because both drainage systems share several similar plumbing components. However, installation details differ between fixtures.
Simple Shower Drain Pipe Diagram Explained
The following text diagram illustrates the basic drainage path beneath a standard shower installation.
Shower Floor
      │
Drain Cover
      │
Drain Flange
      │
Drain Body
      │
P Trap
      │
Waste Pipe
      │
Main Drain Line
      │
Municipal Sewer or Septic System

          │
      Vent Pipe
This simplified layout demonstrates the direction of wastewater movement through the entire drainage system. Every connection serves a specific purpose for efficient and safe plumbing.
Why the P Trap Is Essential
The P trap protects indoor air quality by trapping water inside its curved section. Without this water barrier, sewer odors could enter the bathroom.
Additionally, the trap captures small objects before they travel farther into the plumbing system. Therefore, recovering dropped jewelry sometimes becomes much easier.
Common Shower Drain Problems
Several plumbing problems appear repeatedly in residential shower systems. Recognizing early warning signs helps reduce repair costs.
- Slow draining water
- Standing water around the drain
- Persistent sewer odors
- Water leaking beneath the shower
- Frequent pipe clogs
- Loose drain assembly
- Cracked drain flange
Regular inspections often reveal these issues before they become serious plumbing emergencies. Preventive maintenance usually costs much less than major repairs.
Installation Tips for Better Drain Performance
Always confirm the drain assembly matches the shower base before beginning installation. Compatible parts reduce future leakage risks significantly.
Next, maintain the recommended pipe slope for smooth wastewater flow. Even small slope errors may create standing water inside the piping.
Seal every connection carefully using approved plumbing materials recommended by the manufacturer. Proper sealing extends the overall lifespan of the drainage system.
Finally, test the entire assembly with running water before closing the floor structure. Early leak detection saves considerable repair expenses later.
Maintenance Best Practices
Routine maintenance keeps shower drains working efficiently throughout the year. Simple habits greatly reduce clog formation.
- Clean the drain cover weekly.
- Remove visible hair regularly.
- Flush the drain with hot water.
- Avoid pouring grease into drains.
- Inspect for small leaks every few months.
- Use drain strainers whenever possible.
These easy maintenance steps improve drainage performance while extending the life of your plumbing system. Consistent care also reduces emergency repair calls.
When to Call a Professional Plumber
Professional help becomes necessary when repeated clogs continue despite proper cleaning. Persistent drainage issues often indicate deeper plumbing problems.
You should also contact a licensed plumber after discovering water damage beneath the shower floor. Hidden leaks may weaken flooring and structural materials over time.
Final Thoughts
A shower drain pipe diagram provides a clear understanding of how every plumbing component works together. It simplifies installation, supports accurate troubleshooting, and helps homeowners maintain reliable drainage performance.
Use this guide whenever planning a bathroom renovation or solving drainage issues. Understanding your plumbing layout today can prevent expensive repairs tomorrow while keeping your shower operating efficiently.
Frequently Asked Questions
What does a shower drain pipe diagram show?
It shows every plumbing component and the direction wastewater travels beneath the shower.
Why is a P trap required?
The P trap blocks sewer gases by holding water inside its curved section.
What pipe size is commonly used for shower drains?
Most residential shower drains commonly use a two inch drain pipe.
Can I install a shower drain myself?
Yes, but correct slope, sealing, and local plumbing code compliance remain essential.
How often should a shower drain be cleaned?
Cleaning the drain every week helps prevent clogs and improves drainage performance.